
Just wanted to give everyone a sneak peak on what coming up next, its a national holiday here in Sweden so i m taking the day of the blog (at least when it come to long entries)
Will edit this and share the rest of the article tommorw
Wednesday, April 30, 2008
Photography: Using avaliable light
Tuesday, April 29, 2008
Photoshop: The importance of post processing
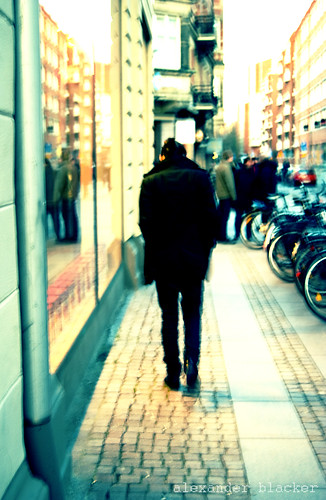
I'm one of those photographers that captures something with their camera, but in my mind another thing is going on, i see something totally different. And this is where the post processing comes in
Over the past few months i must say that my post processing techniques have sky rocketed. I used to know some basics, how to clone and how to fix certain things adjusting levels, but over time i have just been playing around with settings to achieve what i see in my mind when i m looking at something, or at least get rather close to it! There are also a lot of photograph which i don't post process at all, this is just because they don't need any, because the camera captures what i see.
Some people might say that this bad photography but i would like to disagree, i see photography as a form of art, and any type of art form and most of the photographers out there are artist, they see everything differently, and they capture and post process it differently as well.
Below is an example of what i m talking about: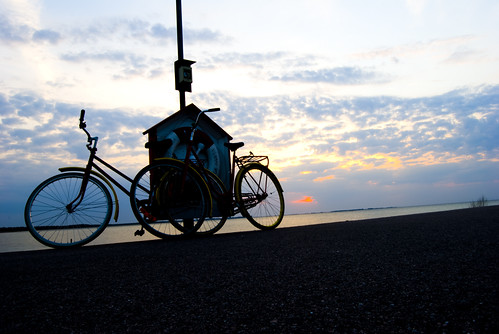
I was out biking and it was sunset time so i went to my favorite spot to photograph, and i was just in a very good mood, it was nice and warm outside the colors of the sky where stunning and i though i would take a picture so i could remember the moment. So i set up my camera, took some test shots to see what what shutter speed and appreture i should use, and selected the desired EV. Then i took the shot, and i looked at the screen and i was like "wow" this isn't what i see. So i said Ok, i wil fix it when i get home
and this is what or very close to what i saw at that moment: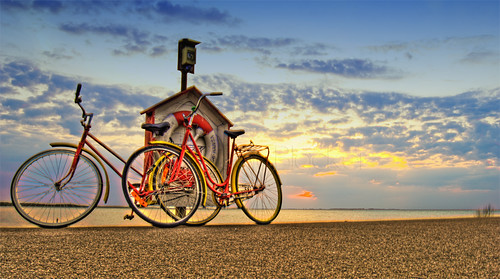
Have a good evening!
All the best,
Alex
Photography: Inspiration and the drive force!
I haven't done a post about photography for quite some time now, and i though i do one.
A quick tip if you already didn't know:
-If your photographing with your DSLR during a very bright day bump the EV down to -0.7 or -0.3 this will give you much better looking photo's. And it will decrease the risk of overexposing!
When it comes to my photography, you will see that most of my pictures are very different. This is because i get "creative" waves as i refer them to, what i mean by this is that i just get a drive force that is in my or in my head that wants to pull of something. I will be trying to do this until i have done it. Then it dies out or i go along with it.
Where do i get my creativity from? I love colors, the more the better the stronger the better, colors drive me to see things and there are moments where i just want to capture a certain color, that is why i like selective coloring a lot, i can enhance a specific color in my image.
Something that i m been into a lot lately is movement, i want to capture movement some how or in some way, this is really hard when it comes to photography because when your taking a photo your freezing a moment, and playing around with shutter speeds photoshop can help but sometime you just don't get what you want.
Fun fact about me: I previously mentioned that i like color, i love color. But when it comes to what i dress i pretty much only wear gray scale clothing, but when summer comes along you will see me walking around like a glowing neon stick :)
Updated: There will be a guest speaker coming in once in a while doing post here, and helping me out to come up with some new things to share with you, his name is Mark, and he is a great guy.
I can't really tell you when is going to pop in but he is :)
Monday, April 28, 2008
Photoshop: Using Actions
Actions can be quite neat when your feeling a bit lazy or don't have the experience with Photoshop to render certain effects to your image. As today i m feeling rather lazy and tired so i m just going to do a quick right up.
Here is how to use those actions that you downloaded:
T "Now that I have this action, what do I do with it?" All actions on this come in zip folders, and you need a program that unzips it, such as WinZip or StuffIt Expander to extract the ATN file.
Once unzipped, we recommend placing all your actions in a common folder. This folder can be placed anywhere on your system. It does not have to be in your Photoshop subdirectory. In Windows, for instance, you could create a special folder under My Documents called "Actions."
Once you have established that folder, open Photoshop, open the actions palette, click the small triangle in the upper right hand corner to access the fly-out menu, and choose LOAD ACTIONS. Using the file dialogue, navigate to wherever you have placed our actions, in our case, "\my documents\actions". Click the "Load" button in the dialogue and your actions are in the actions palette.
There is a simpler way that is not as organized, but that I use all the time. After unzipping your action, simply drag and drop it onto the actions palette in Photoshop. (The palette must be open for this to work.)
A very important side note:
Using these Actions in Commercial Images (info from AntCentral)
We've received a number of questions from professional designers and photographers wanting to know if they can use these actions in their commercial work. As long as you have rights to the original image, how you use these actions is up to you.
An action is really a series of instructions to Photoshop to perform various steps in a set sequence. Some call for decisions from the users, others don't. No action does anything you couldn't do on your own if you had the time, knowledge, and patience. So have at it.
What you may not do is package these actions as your own work, whether for free or for sale. We do know of cases where that has happened.
Sunday, April 27, 2008
Photoshop: Black and White Images
Sorry for the for not posting yesterday i was rather busy with my personal life (yes i have one :D)
Now lets cut to the chase.
I started out with photography taking pictures with film and the film i used was black and white. Now there is always something special about black and white images! Maybe its the tone or the mood they give out but on some photographs they just works great and they add a lot more to the image then a colored image would have done. I m going to scan in a few of my black and whits and show them to you later on.
There are severals ways of turning a colored image into black and white, and i thought that maybe i could just take the time and write a great tutorial, but why do so when there is a great video tutorial out there. I love video tutorials for the fact that you can go back and check out what has been done what setting has been used, you can pause and listen to the tutorial while working on photoshop at the same time! And its some what easier to understand when some one is doing it in practice instead of trying to understand it by reading of a website (like this one for example)
I found this great video tutorial on how to turn colored images into black and white using various ways and the best way, the way that i do it as well! So here it comes, get ready to learn about Black and White photography!
Sit back open photoshop!
Saturday, April 26, 2008
Hello!
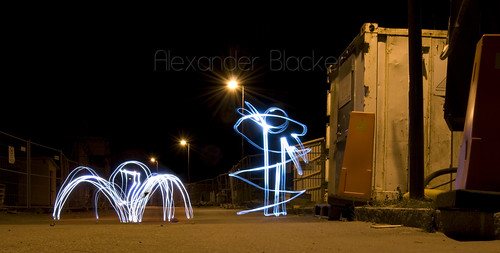
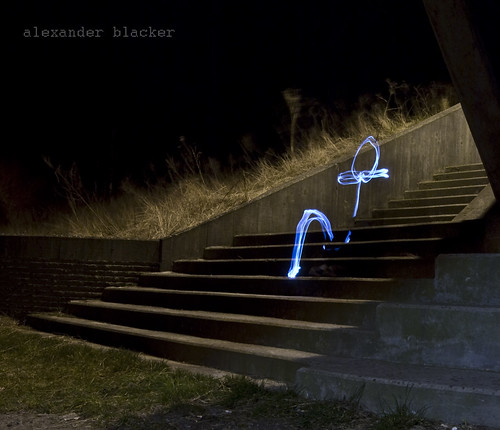
After several requests i have decided that i m going to show you guys my tutorial on how to paint with light, so you can archive results like the ones below.
Now i did this tutorial on video, to make things easier for you! Its was recorded on a point and shot camera so quality/audio is ht best out there! Here are some of the results that you can achieve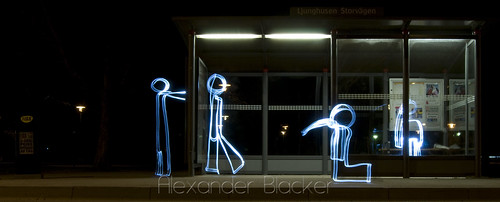
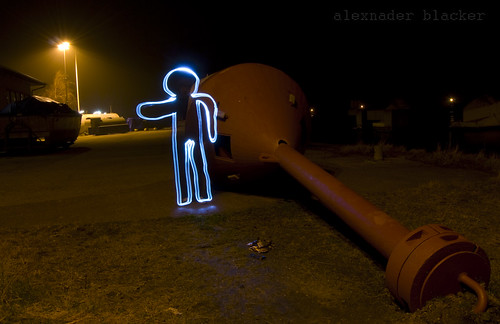
On some parts its unclear what i m saying on the video but when i m pressing the shutter i m saying:
"auto focus" and i did actually say "rock and roll" before you start to paint
Sorry for the bad accent i try my best :)
Friday, April 25, 2008
Photography: Fill Flash
One of the most important things when it comes to photography has to be lightning, and this can be both manipulated and used in several ways (see the Strobist for more detail on how to play with lightning)
I m going to start out with the basics so to speak and we will move up on this ladder.
Yes you can photograph people or objects when its really bright outside and its mid day and the sun is at its highest point! But i strongly recommend you don't do this because:
1-You will probably get a lot of over exposed areas in your image, and fixing overexposure in the post processing its near impossible, its easier to fix darker images
2-If your shooting a portrait you will probably end up with some nasty shadows on the subject like this shot below for example:

(photo from: danheller.com)
Now that photograph has quite a nice background to it, some over exposure at the back of the photo, and well its not really a good portrait if you ask me, its a nice picture buts its just to busy, and the shadow on his face looks very unpleasing.
So what you want to do in situations like these is that you use what is called a "Fill Flash" what this does is that it will send light from your camera or if your using of camera lightning it will shoot in that direction working against the shadows that the sun is creating for example. The flash will "fill" in the shadows and thus you will get an image like this for example:

My guess is that this image was shot with the built in camera flash and thus it turned out the way that it turned out, still a little to dark for my taste. The built in camera flash will only work at a certain distance after that it becomes quite useless, so its worth investing in some sort of external lightning for you camera!
I have committed this mistake as well several time when shooting portraiture outdoors and its really bright! And i had my flash with me, it just did not cross my mind! But now i m all set again!
I just want to inform you that i m starting a new project called "100 Strangers". This project is about portraiture, but taking portraiture of strangers people that you have never meet! I think this is going to be an interesting project that will make me grow both as a person as well as a photographer! As soon as i m done with the project i will of course share the results!
Have a great Friday! See you guys later
So what you want to do in situations like these is that you use what is called a "Fill Flash" what this does is that it will send light from your camera or if your using of camera lightning it will shoot in that direction working against the shadows that the sun is creating for example. The flash will "fill" in the shadows and thus you will get an image like this for example:
My guess is that this image was shot with the built in camera flash and thus it turned out the way that it turned out, still a little to dark for my taste. The built in camera flash will only work at a certain distance after that it becomes quite useless, so its worth investing in some sort of external lightning for you camera!
I have committed this mistake as well several time when shooting portraiture outdoors and its really bright! And i had my flash with me, it just did not cross my mind! But now i m all set again!
I just want to inform you that i m starting a new project called "100 Strangers". This project is about portraiture, but taking portraiture of strangers people that you have never meet! I think this is going to be an interesting project that will make me grow both as a person as well as a photographer! As soon as i m done with the project i will of course share the results!
Have a great Friday! See you guys later
Thursday, April 24, 2008
Photography: Framing your subject
I think its quite important to know how to place your subject into the frame specially if its only one thing that you want as your main subject!
It feels rather natural to place the most important thing in a photograph in the middle, its just the way we do things.
One thing i do not know if a lot of people are aware of but the AF (auto focusing sensors) in your camera can be manipulated, often when pressing the shutter half way down you will hear a "beep" along with some sort of highlight color in your viewfinder or display, this shows you the camera man/woman where the camera is going to have it main focus so to speak, now with the shutter still pressed down half way your can just move around your camera to "frame" the subject nicer to one one side or the other top or bottom and it will still be in focus?
Here is an example: i looked at this thought the viewfinder of my camera then i started of by placing the light bulb in the middle of the frame and pressed the shutter half way down, and when it was time to press the shutter all the way down i moved the camera and placed the light bulb on the top right corner, or a bit to the top right (on one of the intersections of the rule of thirds)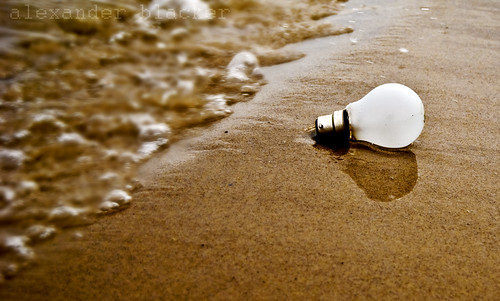
When is placing your subject in the frame a good option? Well i do not have a concrete answer to this question but here are a few example of when it works and that way you might understand a bit better, i personally understand a lot better when i m shown an example the more the better so i m going to try to post as many as i can: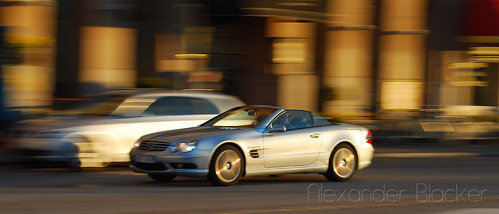

Photoshop: Masking and Expsoure
Masking is a very good tool to have under your belt, why? Because it gives you the opportunity to change only a specific area of the image, and that are can be decided buy yourself.
Masking has got to be one of the most powerful tools in Photoshop, for the reasons stated above. There are several ways of masking.
Instead of typing up a tutorial i decided to make a lot easier for both parties both for me and for you the reader. So i found this great video tutorial on YouTube. Its a series of three videos and well worth the total of 15minutes to watch, and which you can later on just go back to and review them again when you want to apply the tool, you will always be able to find the videos here!
One last comment or tip. Maybe some of you out there do not know this but when photographing the sunset its quite useful to decrease the exposure on your camera if possible, the reason for this is that you will render a slightly darker image, but the colors of the sunset will appear much more intense then they would be. Another great feature of decreasing the exposure is that you will render silhouettes in your images!
Knowing how to mask and knowing how to take great photos of the sunset you can combine two photographs one of a lower exposure where you get to see the beautiful colors of the sky and another image with a normal exposure of 0 for example. Now there is not a perfect exposure to use for sunsets but i find myself jumping between -0.3 to -0.7 and even to -1 sometimes to achieve the desired effect!
Here is a photograph where i combined two photographs, the first image (which i was going to use for a background) was shot with an exposure of -1 then i shot another image so i could show the detail in the gumboots at an exposure of -.3. And with the help of masking i combined these two images into a lovely final image.
Note that horizon is a bit tilted, i need to work on my straightening skills. That might be my next tutorial!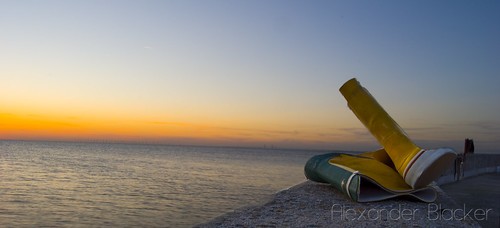
Have a great evening, Ciao
Personal: Of to work
Hello and how is everyone today? i got up a few moments ago and i m of to work!
I got some really nice articles to share and as soon as i get back i will be posting them!
Have a great day until then!
Wednesday, April 23, 2008
Photographs: I love sunset
I love sunsets, why? well because i think the colours are just stunning, its so relaxing to sit back and watch the sun go down (and hope only that it will come up the next day). So today i decided to bring my camera on and place myself in some of the photos of the sunset to make it more personal!

Printing: 6 Steps for better prints
I have been realizing a few things over the past few months when it comes to photography and a way to get good images. Here are some steps
1. Probably the most important out of all the steps: Its very importnat that your screen has been correcly adjsuted when it comes to brightness/contrast/right colours. With a wrongly setup screen you will never really see how the pictures really loook, plus your prints will come out looking very odd. Unfortunetly to get this perfect you will need to invest in certain products which are not so cheap. But if you can get your hands on one that would be superb, you can always try trial and error but this is going to be very time consuming. Below are some links to monitor calibration that might get you on the right path
Monitor Calibration
Monitor Calibration Tool
2. I did this, i costumized my own shooting mode (this is something you dont really need to do when your shooting in RAW and are planning to process the iamge later on, but if your just shooting jpegs it could be quite nice to have). Why do i find this rather importnat is because there are always those moments where you see something adn you want to capture it but when you take a photo your camera isnt captureing the same things you see when you have exposed the image perfectly! How i costumized my own shooting option is that i lined up some white/black objects with texture and diffrent colours, and then i took pictures of them (under what seemed to me as perefcet light circumstances) at EV 0. Just play around with the settings till you get what you like!
3. At least here in Sweden, the photolabs that you get your photos printed (if you do get them printed at a photolab) will make your images go through a "autosetting" where they automaticly adjust the contrast/saturation of the iamges, making the final results look horrible, try to see if you can get passed this by talking to the staff they should knw if they dont knw, then your not at the right place!
4. Cropping - its really important! A crop on the image can make a huge diffrence, it can enhance the main subject (by brining you closer to it) you can remove things that you dont want to be in the frame. Its really important that if you plant to get prints of your image, that you crop in 8 x 10" (inches) or 10cm x 15cm, if you dont do this the print that you will request will be cropped in manner that you didnt want it, you will end up with a diffrent shot!
5. Send in some "sampel shots" to the photolab and see how teh prints turn out, if you dont like the way that they turned try another place, till you get satisfied with the final results
6. Send them the files in JPEG format, why? makes life alot easier it take less time to transfer files, you dont need to be sending them .TIF unless your planning on doing some extravogant with the shots (this is what the guy at my local printer told me, when you want something postersize go for .TIF, but if they are just standard 8x10" or 10cm x 15 cm JPEG is good enought)
Photoshop: Creating Frames
In this post and the previous one is a glimps of some simple ways of creating frames for your digital images!
This method is great for when you dont want the image to be completly central
Step 1: Open the image in Photoshop/Elements this will create a "background" layer, note that this layer is locked so unlock it just double clikc the layer and when the dialog box comes up press ok (now the layer is unlocked)
Step 2: Create a new layer, to do this go to Layer>New>Layer (Ctrl + Shift + N), this will give you a new layer. Note that this new layer will appear above the background layer, drag this "new layer" below the actual image, so it looks like this:
Step 3: Now on with this layer you change the Canvas Size, which is explaind in the other post (scroll down a bit) Note that you wont be able to select the "colour" this time but this is easily using the Bucket tool (hot key G) and play around with the desired colours.
By using the Move Tool (hot key: V) you can move the image around so you can place it any where you want to below is an exampel
Photoshop: Creating Frames
In my previous post i pomised i was going to have a tutorial on how to frame your images here is three ways of doing it.
Step 1: Open Photoshop (i think this will work in elemts as well as lightroom, not 100% sure)
Step 2: Drag/Open your image in Photoshop, go to Image>Canvas Size (Alt+Ctrl+C). This will open the following dialog box:
Check the box that says "Relative" this means that the numbers that you choose will work as lock so you dont get more on side then the other.
The Canvas extension colour box allowes you to choose the "new colour" that is going to appear, in most case you will probably use white or black.
You will end up with something looking like this
Thats a good enough for some people, you can repeat the process above serveral times using diff frame sizes and colours. Here is another exmaple doing the Canvas size three times
Photoshop: Creating Panoramas
Creating panormas has aways been a rather hard task (i tired once manualy by attaching serveral images didnt really work out great) But with the help of CS3/Photoshpo this can be quite an easy thing to do, just got a sit back and click a few time!
Before starting, panorama photogrpahs are a series of photos that are taken from the same location/are and then merged toghter to create one big image, a panoramic view!
You dont need to have a tripod for taking panorma photos these days but it sure makes life easier, but as long as your about the same angel (the less you vary the horizontal angel the better shot you will obtaine) you should be fine.
Here is my tutorial on how to create Panorama photos:
This can be applied both to photoshop and elemnts:
Step 1: Open the sowftaware of course
Step 2: Go into File>Automate>Photomerg (this brings up a dialog box that look like below) Select then Auto (unless you want to play around with the other options)
Step 3: Locate your files on your hardrive by clicking the "Browse" key this will bring a up a new window where you can select the jpegs or other type of image files that you want to use, press the key Ctrl down and click all the images you want when done pree "OK" and you will ahve something that looks like this below: When you see this then press "OK" one more time, this will load the actualy photos toghert and will line up the shots
Stemp 5: After clicking "OK" on the previous step you will end up with something that looks similar to this:
Now use the crop tool (hot key C) or the rectangle tool and select a straight area/rectagular area, so you get a straigh top/bottom and a straight sides
Your final product could end up like this (note that the frame of this image has been added later on, adding frames is a tutorial for later)
Here are some Panoramas i have created:
Västra Hamnen, Malmö Sweden: (3 images togher) - click the image for larger version
Ljunghusen, Sweden (10 images togher) - click the image for larger version
If you want to see more go to:
My Flickr
Design: Getting Started
Yes over the past few weeks i been thinking of doing some freelancing design, just to get started combine both photography and illustration and just have fun. I though i could have this as a side project while i m doing alot of other things, i enjoy it and if i make the extra cash why not? and if i dont then there is no problem, i already have a job! I been working an a few things these past weeks:
The first thing i just about finnished my logo that i m going to have, I m not 100% satisfied with the colouring so any input would be great (just leave a comment)
And then i been working on the "main page" for the website as well, which i m going to stick with it because i really like it (debating where either i should keep the guns or not, might not be such a good idea, gotta think about that)
If you guys are intrested in the this type of work i m going to line up some tutorials that i have used to create such things! Just let me knw
DSLR Tips
I have been a member of Camberalabs for quite some time now, and i found that the website helped me alot in the begging of my DSLR days, so i though i might share some of the things that Grodon Laing has to offer to you!
On his website DSLRTips he has provided alot of video tutorials on how to photograph under diffrent circumstances, what setting to use to achive a certain effect, how to use a fill in flash. Great basic tutorilas, and free of charge!!
Her are some to get you started for more visit DSLRTips and if your wondering about a product review Gordon Laing has a great deal of them here Camera/Lens/Point and Shoot/Accessories/Feature and much more.
Basic night photography:
How to blur water for a dreamy effect:
How to blur action shots for a feeling of speed
Monday, April 21, 2008
Photoshop: The Transfor Tool
Came home today witha great idea in my head i wanted to combine a Apple and a Orange into one. But, as i got home there were not apples or oranges in the fruit basket, so with the help of my "mentor" Ed Tang he provided me quickly with a shot of a appel! And the orange shot i actualy find amongs the photos i keep on my hardrive
The Results
How did i do this:
Step 1: Open CS3 or Photoshop
Step 2: Import image (appel image) to CS3 just by dragin the jpeg document and dropping it in the open CS3 window.
Step 2: Press the backgroud layer and Ctrl+J this will copy the current selected layer. Delet the background (this is just another way of unlocking the background)
Step 3: Use the colour selection tool to just select the appels themself and not the background. Link below on how to do it
-Color Selection
Step 4: With the "white area selected" adjust the levels til you get a white background in case you dont have one (this step isnt necessary if you have a plane background). To adjust levels make sure the "appel" layer is selected and go inot Image>Adjustments>Levels. Move the sliders around till your pleased with the white
Step 5: Now its time to change the colour of the appel, because the picture that i started with orgianly was a red appel, sow what you do now is that you inverse the selection of the white background. To do this go to: Seletct>Inverse or Shift+Ctrl+I and now go to Image>Adjustments>Hue/Saturation. Play around with the sliders till your statisified with the colour
Step 6: Import the Orange image into CS3, and use one of the selections tools i posted about in my previous post. Make sure the layers i on a transparent background so just erase anything you dont want to appear. But keep the juicy stuff!
Step 6: Select the the rectangle tool and then copy the desired selection of the orange that you want to use. Then press Ctrl+C and go back to the apple window, and press Ctrl+V this will paste the orange image as a new layer in the appel document. Now go into Edit>Transform>Warp/Perspective play around with these settings untill you get the orange in the place you want it to be the, then your DONE! :D
Photoshop: Playing with layer options and layers
I am a big fan of Photoshop, what i mean by this is that i seem to find out how to do crazy things everytime i open the program and end up going experminatl almost all the time.
I did an Illustration some weeks ago, which i tiled "ABSOLUT PSYCHADELIC" i was working on creating some ad-related materials, just se how it felt. I ended up beeing quite pleased with the reuslts:
The Reuslts
How did i do it:
Step 1: First i jotted down some ideas that i had that could work toghter, started out doing some sketches to see what would work.
Step 2: Decedide upong going witha psychadelic effect, which i did. So i started out by carfeully drawing out the "outer shape" of the absolut vodka bottle (happend to have some here at home) then i tranced the text into the shape, and scanned the document.
Step 3: Open CS3 (or any Photoshop version) create a new image (File>New) choose something tha you think is apropiate (i used a height of 800 and a with of 600pixels).
Step 4: Make the background layers black
Step 5: Import the scanned document into CS3 or Photoshop, then carfeully select the appropiate section with one of the various way of selecting things in photoshop. Ther are various ways of doing this here is a list with links (just click)
-Quick Mas Mode
-Basics on Selection tools and how to use them
-Very accurate selection
-Youtube seach on how to select
Step 6: Using the pen/bruhs toll to create the shapes that you can see in the image, go for anythign psychadelic really (strong vibrant colours). Then with with the Layer options you add the glow, note that thats its quite convient to create a new player for each time your doing a new "design withing" the image, makes life alot easier in the long run and in case you want to come back and change things. Links to using the pen tool below
-Using the Pen Tool
-Youtube seach for Pen Tool
-Glow Tutorial
For more of my images go to:
My Flickr
Studio: Third Attempt
So what i did was to shoot my xbox controller, and i though i might take it to a bigger level so to speak, by this i mean shooting bigger objects and see how the light plays on that!
The Results
(still working with the same setup, matreialywise speaking)
i used various light sources on that image, and i was wondering if anyone can guess thier "angles" to the controller would be intresting if anyone has tried this on thier own and actualy learnt something 
Welcome! I ended up doing another shot jsut a couple of minutes ago, did the set up really simple and found another light this time which sure did help a tad but not that much, it wasnt working great, its needs a bulb change that for sure
here are the shot:
The Results
The Setup
Studio: Second Attempt
I wanted to share that with everyone as well as the second setup that i was working with. I think playing with lightning is alot of fun and i end up doing some pretty crazy things. I have no tripod (yeat) but i will get one. Here is another shot of my setups as well as the results
here are the shots:
The Results
The Setup
p.s. those pink gloves on the setup images are not mine, they belong to my mother and i used them when i was handeling the glass that i shot on, i gave it a really nice clean and then i used the gloves.
Studio: First Attempt
Well i was sitting around before bed time craving to take some shots, but wasnt really in the mood of going out. So i started building a studio at home so to speak. Now i use A4 papers for reflections, and decided to pic up some objects i had laying around the house and shoot them just for funsies!
The Reults
The Setup
the last pic is a picture of the setup i was working with, the orginal shots came out quite clean, apart from i gotta way to disguise the shadows i think i need a 4th of 5th source of light. There was barley any light in my room, but i shoot at ISO 100 anywas, i had mounted the SB 600 with the difuser, when i was messing around to hook up all the lighting i wanted to move one of my lamps in my room and the bulb broke now i only got 1 out of 3 working, time to change them here the shots come, some what diffrent but i just wanted to share like always!
if your wondering that orange stuff isnt orange juice its passion fruit extract with water, and water bottle, celotejp to place the A4 togher, IKEA lamps, some of my pictures on teh wall that i developed back in the days in a lab, and a souviner that i brough back home from brazil on the window rack!
How To: get a star shaped sun
Its always been a "NO NO" when it comes to photographing towards the sun, but i honestly really like the effect of taking such images, creating the silutes and creatinga very drastic contrast between the ground and the sky. The other day i realised that taking pictures of the sun att smaller appretures (f/5.6 for exampel) tha the sun came out like a round ball, rather dull, like in the image below:
 (image from fotoguiden.se)
Then i decided to go for a larger appreture (f/22 for exampel) and i realised that the sun had had become much more intresting then it was in the previous photograhp, it obtained a star like shape which added alot to the feeling of the image. Here is an exampel (note that the exampel picture isnt great and there seems to be some dust and whot not on the lens but it illustrates what i was walking about)
 (image from fotoguiden.se)
note the lens flare, which can easily be avodided by using a hood or simpley by covernig the lens with your hand!
Subscribe to:
Posts (Atom)
