
There has been alot of DIY things floating around in my head, and as some of you know a while back i showed you how i did some "studio" shots that work really nicely if your into product photography.
Below are some "essentials" that you will kind of need, but that you also probably have laying around in the house.
1. Light
Some sort of light is a big advantage, the more you can move it and twist it the better. But if your planning to combine two different light sources try not to do so, because it will mess with your WB. Remember to preset the WB, which makes life a lot easier in the post process stuff. Light is not necessary but it allows for flexible working hours so to speak.
2. Background
Black and white paper, or sheet or cloth or a t-shirt, anything that is uniform in one of the colors will make great backgrounds. Remember you can also combine colors, just have in mind what "effect" you want to go for. Remember you can also reflect light with the white objects!
3. Camera
The only thing you will mostly working with here is aperture and shutter speed, so its not only DSLRs that you can use this with, also those high end compacts will work for this type of project.
4. Some sort of "tripod"
What i mean here is that you dont need a tripod tripod, one of those things with three legs etc. The whole idea of this is that you want to have the stuff laying around, to take some photos if your bored for example. I have used everything from a cup to books to pillows, to anything that will create a new angle will work. The more things you use as your tripod the messier its going to get, so think about that before your stacking up with 30 books to use.
5. Glass
Glass, might be hard to get, but it was not for me. Glass is great to lay above your background color to create the "reflective" effect, so if you have a picture frame that is a bit on the older side, odds are that the cover is made from glass and you can just remove it from the time being. Thats what i did and it worked great - now handle the glass with care, i dont want to hear stories about you guys cutting yourself, and handle the glass with some sort of protection to keep those finger/fat prints of it!
Thats pretty much it, with some practice you can pretty much have your own studio at home, the bigger the subject the bigger everything needs to go - that pretty much a studio in a nutshell
Wednesday, November 5, 2008
Photography: Home Made Studio
Tuesday, November 4, 2008
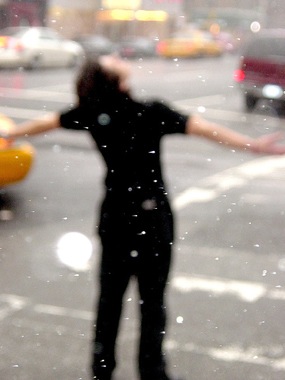
Photography: Taking Unfocused Shots
orginal post by dps blog
We all have heard out there that they key to good photography has always been to get those perfectly sharp and in focus shots, specially when it comes to portraits.
However purposely leaving your main subject (or the whole shot) out of focus can also create a stunningly dreamy images also.
1. You might choose to focus on a seemingly unimportant element of the scene (do this by choosing a wide aperture which will give a narrow depth of field and focus on something in front of or behind your main subject).
2. The other option is to make your full image out of focus but choosing to focus well beyond or in front of your main subject. Again, a wide aperture will help here and you will probably need to switch your camera to manual focusing mode or it will attempt to find something to focus upon.
This second option will take a little experimentation. Get things too unfocused and you’ll end up with a completely unrecognizable subject - the key is to have enough focus for it to be recognizable but out of focus enough to create a wonderful dreamy mood.
Below are two more examples of unfocused images for a little inspiration.


Monday, November 3, 2008
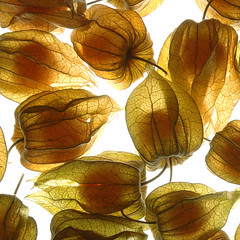
Photography: Backlit Subjects
orginal post by dps blog
Back light has some what been another one of those typical "no no" things that you should not do when it comes to photography. One of the first thing that some one thought me was to always shoot with the sun hitting your back. This just made pictures better for some reason, but during the past few months i been checking out back light photography so to speak. And its really nice
Why backlight?
- backlight can add drama to an image
- backlit images can show the delicacy of a subject (think transparent or translucent things like flowers or insects)
- backlight can help create real mood in a shot
- backlit images can highlight details on the edges of subjects
- backlight can reveal textures that might previously have been hidden
- backlit images can show off the shape and form of a subject
- backlight can create shadows that add points of interest to an image
Below are some really nice backlite photos:

Another thing worth mentioning is that metering can play a big difference here, so try spot metering if you want the foreground to be properly exposed or use a fill flash! Try a few different things, and feel free to share!
Saturday, November 1, 2008
Monthly Assignment : November
The monthly assignment is something that i m going to start this month and its going to be going for the whole month, until the end of it that is.
So what is this deal? Well its to push you to get some nice shots and to work as an incentive so to speak to get your camera out there. Note i will also working on this.
So how does it work? Well what you want to do is that you want to upload the image to flickr and tag it with "blacker-november08" for the November assignment for example and, and the last word in the tag will change from month to month, and year wise as well, note that were moving into 2009 soon!
So this months assignment is going to be, Portraits
This mean a photograph that includes a person some how.
There are some rules to be followed, this they are the only to get you working and practicing your photography. The rules are that the image should be taken on the same month for the monthly assignment so to speak. So for this month the shot has to be taken in November.
I will pick a personal winner, and who knows i might reward that winner some how?! So lets start snapping those images, and remember you only got one image per person!
Categories that i will judge the image by: lightning, creativity/idea, theme, composition, and i will ask my mom what she thinks (she is very biased and only likes a very few pictures), but she wont make the final decision but it will have some sort of influence.
Get out there and shoot some portraits for me :) and place some entries, remember to post the image in the Bläcker Photography Flickr Group, if not i cannot find them that easy! Thanks!
Most important of all is that you have fun
Thursday, October 30, 2008
Photography: Capturing Motion Blur
orginal post by dps blog1. Slow Down Your Shutter Speed
The reason for movement blur is simply that the amount of time that the shutter of a camera is open is long enough to allow your camera’s image sensor to ’see’ the movement of your subject.
So the number one tip in capturing movement in an image is to select a longer shutter speed
If your shutter speed is fast (eg 1/4000th of a second) it’s not going to see much movement (unless the the subject is moving mighty fast) while if you select a longer shutter speed (eg 5 seconds) you don’t need your subject to move very much at all before you start to see blur.
How long should your shutter speed be? - Of course the speed of your subject comes into play. A moving snail and a moving racing car will give you very different results at the same shutter speed.
The other factor that comes into play in determining shutter speed is how much light there is in the scene you are photographing. A longer shutter speed lets more light into your camera and runs the risk of blowing out or overexposing your shot. We’ll cover some ways to let less light in and give you the option to have longer shutter speeds below.
So how long should your shutter speed be to get movement blur in your shot? There is no ‘answer’ for this question as it will obviously vary a lot depending upon the speed of your subject, how much blur you want to capture and how well lit the subject is. The key is to experiment (something that a digital camera is ideal for as you can take as many shots as you like without it costing you anything).

photo by: mjmr2008
2. Secure Your Camera
There are two ways to get a feeling of movement in your images - have your subject move or have your camera move (or both). In the majority of cases that we featured in last week’s post it was the subject that was moving.
In this type of shot you need to do everything that you can to keep your camera perfectly still or in addition to the blur from the subject you’ll find that the whole frame looks like it’s moving as a result of using a longer shutter speed. Whether it be by using a tripod or have your camera sitting on some other still object (consider a shutter release mechanism or using the self timer) you’ll want to ensure that camera is perfectly still.
3. Shutter Priority Mode
One of the most important settings in photographing an image which emphasizes movement is the shutter speed (as outlined above). Even small changes in shutter speed will have a big impact upon your shot - so you want to shoot in a mode that gives you full control over it.
This means either switching your camera into full Manual Mode or Shutter Priority Mode. Shutter Priority Mode is a mode that allows you to set your shutter speed and where the camera chooses other settings (like Aperture) to ensure the shot is well exposed. It’s a very handy mode to play with as it ensures you get the movement effect that you’re after but also generally well exposed shots.
The other option is to go with Manual mode if you feel more confident in getting the aperture/shutter speed balance right.

photo by: Rob Caugh
All images where taken from the Flickr Group
Wednesday, October 29, 2008
Inspiration: Underwater 360 Pano
I was just messing about on the web looking at photographs as usual, and i stumbled upon some 360 underwater images, i couldn't not believe it, i have never seen such a thing before so i just had to share the image with you guys!
I think this is just amazing, i scuba dive during the summers so i m a big fan of the underwater world, but i never had the chance to photograph under the surface. P.s scuba diving has got to be one of the most relaxing things to do out there


Inspiration: Rain photos
I m going to start posting some "inspiration" photos every week or so, as it was raining today i decided to go for a rain theme - i could not find any rain shots from the Flickr Group so i juts grabbed some random ones of the web. This is of course leading up to a upcoming post!


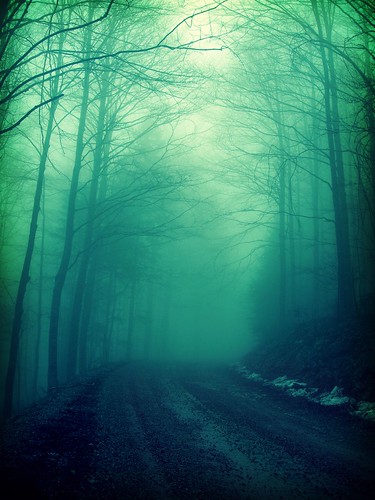
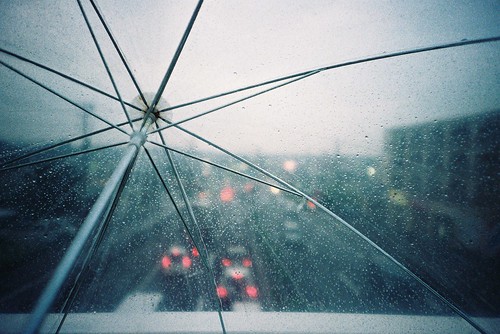
Hope you enjoyed them, they are some lovely shots, and i hope they inspired you to take some photos
Video: 10 Photography Tips
Apart from the advertisement this video is really good, its a very basic understand of portrait photography! So check it out, this is no ad for her or her books whats so ever, so feel free to skip like the 30sec of the video
Comments and critique on the video and add tips, just place a comment in the comment section!
Monday, October 27, 2008
Photography: Shooting into the Sun
orginal post by dps blog
Here are eleven quick and simple tips at combating the problems that bright sunlight might bring when shooting outdoors:
1. Move into the shade
With some subjects you’ll be able to move them (and yourself) into the shade. This is particularly relevant with portraits where your subject is highly portable. Sometimes the simplest solutions are best.
2. Make your own shade
If your subject is not movable (for example if you’re shooting macro work with a flower) create your own shade. Use your own shadow, the shadow of someone else or bring an object with you (like an umbrella, a reflector or large sheet of card) to block out the sun.
4. Use a Reflector
Another way to fill in the shadows caused by direct sunlight is to use a reflector. These bounce light up into the face of your subject and are great because they allow you to shoot into the sun - as with when you’re using fill in flash.
5. Change Your Perspective

Sometimes moving your subject isn’t possible - but moving around it can give a different impact. This might be moving to the other side of the object, shooting from directly above or even getting down low and shooting up. Doing so will change the angle of the sun hitting both your subject and the camera and give your image a completely different feel.
6. Use a Lens Hood
Suffering from lens flare? If your lens came with a lens hood - get it out and use it. If you don’t have one - it’s not difficult to construct one out of card - or to even use your hand to shield your lens from the sun. Just make sure that your shot is free of your hand or the DIY hood that you’re using.
7. Filters
Sometimes a filter can be handy when shooting in bright sunlight. I try to take a CPL with me at all times. The polarizing filter will help cut down on reflections and cut down the light getting into your camera to let you use slower shutter speeds and smaller apertures if you’re looking for more control over these elements of exposure. Polarizing filters have the added bonus of giving you some control over some colors - particularly when you’ve got a blue sky in your shot .
8. Play with White Balance Settings
Many digital cameras come with the ability to choose different white balance settings. While you can make adjustments later on post processing (particularly when shooting in RAW) choosing the right setting at the time of shooting can be worth experimenting with. I personally shoot in RAW and do this later on my computer - but have friends who prefer to do it in camera.
9. Metering
Direct sunlight makes correct metering tricky. In these conditions I generally choose spot metering mode on my DSLR and choose the main subject of the scene that I’m photographing (the focal point) to meter off. Alternatively pick a mid-tone area to meter off if you want everything to be exposed relatively well. Check your shots immediately to see if you need to adjust your technique (your histogram can be handy here) and if you have the luxury of time - take multiple shots metering off different parts of the scene so that you can choose the best one later.
10. Pick The Time of Day to Shoot
For many of us we won’t have the luxury of sitting all day long waiting for the perfect light - but if you do, the time of day can dramatically impact your shot. Dawn and Dusk are particularly good times to shoot as the direction and color of the light is often more useable than the direct overhead light of noon.You can see this an alternative to shooting during the golden hours if you will!11. Shoot Silhouettes
‘If you can’t beat em join em’ is a saying that could come into play here. If the bright light of the Sun is causing you a headache - why not use it to your advantage and make your subject into a Silhouette against a bright background.
This is kind of a follow up to shooting portraits, you can get some great results using the fill flash, reflectors etc!
Photography: DIY Lightning
orginal post by dps blogIn this post I’ve found 10 DIY Flash and Lighting Hacks that put some of these lighting techniques within the grasp of the rest of us. Some are more involved than others but all are fun and will provide you with some new lighting gear to experiment with.
1. Multi-Super-SB-Ring Light
 What can you make with six speedlight flashes, a coffee can and a little spare time?
You get a multi-super-sb-ring-light! (pictured left).
You could probably also blind a small village if you’re not careful!
Find out what it is, how to make one and what the results are like here.
This one looks like a lot of fun to play with - even if it’s just for the challenge of it and the looks you’d get when you pull it out next time you do a shoot..
2. Poor Mans Ring Flash
 All you need for this one (pictured left) is a used milk bottle/jug and some scissors.
The result is that you’ll have a Poor Mans Ring Flash.
A ring flash is one that fits around the lens - it creates a wonderfully unique lighting effect. They will usually lighten your wallet by a couple of hundred dollars.
3. Inexpensive Light Tent
 Have you ever wanted to replicate the crisp clean product images that you see in catalogs with the products seemingly floating on a white background?
If you do - you need some kind of light tent/light box.
As usual, light boxes can cost you quite a bit
4. Party Bouncer Card
 Another cool DIY Hack is this Party Bouncer Card (pictured left) which is so simple yet promises to be so useful and effective.
This one is for those of you with a camera which doesn’t have the capability for an off camera flash.
It allows you to bounce some light off the ceiling while also diffusing the light going forward - this will enable you to get a less harsh flash effect that many flashes leave images with. I like this one as it pushes the light out from your flash in two directions which can lead to a more even light rather than just diffusing it - a little more sophisticated.
Another quick DIY on diffusing a flash is to put a little translucent magic tape over a flash (or a piece of white tissue paper can do it too).
Any of these methods will decrease the amount of light getting out from the flash onto your subject - hopefully resulting in a more subtle light and a less blown out image.
5. Turkey Pan Beauty Dish
 Beauty dishes are wonderful pieces of photographic equipment to experiment with - but they can be very expensive.
Not any more (at lest if you use this DIY trick).
In this hack learn how to use a simple Turkey Pan to get some pretty amazing beauty dish results! The comparison examples in this tutorial between the turkey pan version and the real thing are pretty convincing.
I must remember to add Turkey Pans to this week’s shopping list.
6. DIY Ghetto Flash Extender
 I’d not heard of this type of device before - but since I found this tutorial I’ve discovered a number of photographers who for one reason or another want to be able to extend the reach of their flash.
This is particularly useful for wildlife photographers who want to supplement natural light in tricky lighting with fill flash. Of course sometimes it’s difficult to get close to that animal and a normal flash would have no impact.
Enter the Flash Extender (one popular one is the ‘better beamer’).
Want to make one for yourself? This tutorial for the DIY Ghetto Flash Extender will tell you how.
7. Disposable Camera Flash Slave
 Lately I’ve had more and more questions from readers about how to set up shots with multiple flash units to light a subject from more than one angle.
It’s not difficult to do if you have the budget to buy yourself an extra speedlight flash or two (or more) but if you don’t have the budget is there a way?
In this tutorial and author shows you how to use a disposable camera to act as a remote slave flash.
OK - this tutorial isn’t for anyone looking for a quick simple solution - but it is a challenge that I’m sure some of you will be up for (Jake?!)
8. Flash Mounted DIY Softbox
 Another way that professional photographers diffuse the light that comes from a flash and gets a nice subtle and even light on their subject is to use a softbox
A softbox sits over a light (it’s a big box with white walls) which ensures the light is spread out evenly.
This DIY Softbox tutorial is great - it requires card, a white sheet (silk if you can), velcro, scissors, glue and the template that the tutorial provides you with.
The results look pretty good - but if you want more DIY softboxes the same site also has another tutorial for an alternative softbox.
Again - this one looks pretty good.
9. Flash Bouncers

It costs £1, takes 5 minutes, requires craft foam, a little elastic and some scissors.
The tutorial even includes a template for you to print out on your printer and then cut out - what more do you need?
Even the technologically challenge could make this one (speaking of myself of course).
Nice work from Chris with that one.
Another similar Flash Bouncer/Diffuser can be found over at DPReview here. This one is foam also.
Lastly - another card/paper version of the flash bouncer.
10. Full Budget DIY Lighting Studio
 It’s time for one last DIY lighting hack - this one attempts to bring it all together with a full DIY Budget Studio setup.
The author of it takes up the challenge of creating a full studio lighting system for under $75.
It includes lights, reflectors, diffusers and flash diffusers - all using items that you could pick up at hardware and craft stores.
It also shows you a few test shots at the end of the tutorial that compare different lighting options.
You will need your own flash unit to use the flash diffusers on - but the rest is all included in the tutorial.
