
So i have about 10 tips remaining.
Lets keep on going then:
16.
Vary your angles when taking a photo. What i mean by this is that try laying down, try getting up on a higher level, this will make a big difference when photographing. I try not to shoot from my eye level. This is because i have found it much more fun and the final results of moving about to be much more interesting then just putting your camera to your face and snapping away. I tend to use the lower angle more often the a higher one just because its easier to go down then to go up. But if i have the chance i will try to get up higher and to take a picture and see who it looks. Move left and right as well, the subject will change alot when your shooting it from the right hand side to the left hand side. Scout different locations around the target that you want to photograph.
Below is an example if this, this is a old train station that i was shooting, the first shot (which is my fav) was shot from a lower angle but moving to the right (if you where looking at the building straight on) and the second shot was just straight in front but still at a lower angle, if i was going to shoot this picture (which i have tried) from my eye level the shot just came out looking bad

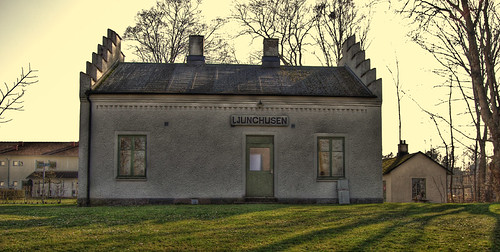
The difference in the image is just huge, i prefer the first shot to be honest with you (from a comparing the subject matter view)
17.
Think about what background your image will have, this can have a great impact on your image. A plane background (one color) can look great for close ups, macros and portraits. But a buys background can work great for portraits as well as many other types of shots. I think about this maybe a bit too much, if i m going to take some landscape shots. I take into account the background alot, i look about to see if the houses will fit in the image, i look to see if there is any human waste (i tend to clean up alot of trash when photographing for some reason). The list goes on and on, but you get the picture. The background plays a very big roll, it can make a photo pop more and it can do wonders to your framing.
The image belows gives you a reference of what i m talking about. This image was taken like this, i placed the camera on M mode and then increased the shutter speed, while having a very very big appreture (small f-number). What this caused was a blurring of the background (or a bokeh) and it only capture the strong light from the sun hitting the subject. Thus making the flower pop out alot on the black background

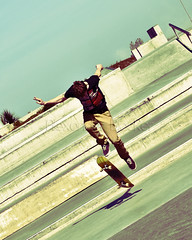
This photograph that i took of this skateboarder is another good example, note the lines crossing the entire background; if you follow them you will hit the main subject, in this case it works to place the subject in the middle of the frame because of those lines in the background.
18.
Knowing the range of your flash is very handy as well as well as the time it takes for the flash to recycle (to be able to fire of a burst of light again). When i was of taking pictures of the skateboarder kid, i didn't take the recycling time into account that why i ended with some what of darker photos, the flash would only fire of at the first picture while i would always grab the best shot on the second or third photo, and i wasn't thinking about the recycling time at all. I know the limit of my flash its about 20m, but only on full power which means i have to take into account the time it takes for the flash to recycle if i want multiple photos. This can be quite handy to know.
So what do i do about if i more photos with flash but the subject is far away? Well try to get as close to the subject as you can and decrease the power of the flash (for those who use the TTL or automatic settings on your in camera or of camera flash the TTL should take this into account) this will make it possible for you decrease the recycling time and still get a good lit subject.
19.
Try out the vertical angle, i must say i don't use this angle as much as i should. But the results can be very different from shooting horizontally. Why do we shot more horizontal pictures? Well that is because the camera is naturally design for that position. I am starting to make myself try out the vertical angle more and more! Try it out, not only for portraits bot for landscapes as well, and macro shots.
20.
Be bold, try to break the rules and see how that turns out. If it does not work just take go for a safer shot, you wont regret taking that bold shot, its not going to hurt you in any way. Give yourself room to experiment when the chance appears. Try something different, try to go with your instincts some time and see how it turns out, but only at home lets not forget what i wrote in my last post.
21.
Dont think about getting the horizon perfect when taking the image, or getting those lines at a perfect angle, you will be able to fix this when you get home so don't waste your time on that, i will be doing a tutorial on how to straighten your images later on.
22.
When shooting portraits, don't cut your subjects of by any background lines or background objects. This will look very unpleasing to the eye of the viewer and it can ruin a good photo. Below is an example of what not to do-note the big metallic thing just behind her head, it doesn't look pleasing what so ever, but i saved this shot by cloning that out, as well as the line coming down to her left shoulder.

23.
Organize yourself, keep your photos well organized so you can remember where certain photos are. I organize my things by naming them and giving them dates and a small very detailed description of where and when i was taking the photos. So i want to check out an image i just go into my photo album and check the dates the title and i can easily find my shots. Don't just transfer them into the computer as DSC_0218, because how are you going to recall that number for that shots, i find it impossible, but if you can then be my guest and do it. That extra little time will help you out in the long run.
24.
Starting to run out of tips here.
If you don't have the focal length to take a picture, take a picture in RAW format (to make quality as good as possible) and then later on when back home on the PC/Mac you can always crop the image and that area will "get" closer so to speak, working indirectly as a longer focal length, but this will not do wonders. You will loose quality if your give the image a too big of a crop (keep the crop at 100%). And use the crop tool to make things pop, or to frame your subjects better. And keep that in mind when photographing.
25.
The glorious check list-take a good look at your camera before heading out. Check that you have the correct ISO level, check that the camera on AF (auto focus) or MF (manual focus) before heading out. Check the battery level as well as the memory card memory, i have gone out once and had to throw away a whole batch of photos because i had forgotten to change the ISO from 800 to 100, all i ended up with some very noisy pictures that couldn't be saved.
Thats all for now, will be hopping in later today and sharing a tutorial on how to straighten those images in Photoshop. I hope this came to helps at least some of you!

2 comments:
Hello, I would just like to say I find your blog very interesting to read, found it a couple of days ago on DPS, and I keep reading it ever since :) Keep up the good work :)
One question, if I may. I am interested in getting an external flash aswell, and except for the price difference, I still don't know what's the big difference between SB-600 and SB-800 ... did you ever have the chance to play with the 800 ?
Hey Ice,
Thanks for reading, i m glad that you are enjoying it! Did you learn anything? If so feel free to share and i can post the results (image) up here if you want to! I will try to keep up.
As far as it comes to using the 800, i have never had the chance, but i m VERY VERY happy with my 600 its a really great flash and its very cheap compared to the 800 which is about twice the price.
I just posted some info about the two flashes (i have a feeling that its a tad confusing) but i think some people will understand. I hope that helps you some how.
Feel free to comment anything else!
Post a Comment