
One thing I love about Photoshop is that it allows me to clone things, away or replace a sampled area with another. There is always that moment when your going to take a picture of something really nice but something just get its in the way, or maybe you forgot to clean your sensor and ended up with some awful dust spots on the image? Well fear no more I give you the cloning tool, or the magic tool!
Let’s get started:
The cloning tool or the stamp, has the hot key “S”. Knowing hot key’s on Photoshop is going to save you plenty of time in the long run, so get to know a few at least.
I will be starting of by showing the original image and the final product and how I did (only using the cloning tool) and then show the final product.
When I clone I work a lot with the opacity of the cloning tool because I don’t want to make the cloning obvious and my bet is you neither want to that.
I will use the image of my best friend and his girlfriend sitting at the in the backseat of my car. A great photo of how he was feeling and how she was feeling at the time (he was really tired he just got home from the military service while she didn’t want to be on the photo)

Start of by clicking on the clone tool or press “S”
Then you need to sample an area that your going to copy or clone so to speak, to sample hold down the “Alt” key and left click on the desired location, NOTE: that you will need to resample a lot of times, always try to resample around the are your wanting to clone out.
A big note, when ever you sample not that that sampling are will be as big as the current brush size your using, this is a something that Adobe has not incorporated into this tool which is quite weird, some how the sampling tool is always the same size, smaller brush size are easier to work with.
In this case I clicked just around the hair the, and I start of with a opacity of about 50%. You want to start out a bit rough and then cover the biggest chunks so to speak first. Then decrease the opacity to about 10% and start fine tuning the image.
Zoom in its very important, so you can see how precise your are being.
Now lets take a look at the results:

I cloned of that annoying hair that was ruining her face, and now the image looks a lot better, her face looks much more cleaner, and can you tell that I have cloned it out? I cannot tell at least. I find it hardest to work on the skin because it has so many different tones.
Now to Photoshop CS3 cloning
Photoshop CS3 cloning: using different sources and the cloning tool. Photoshop CS3 has the neatest cloning tool, a tool where you can select different sources (images) and clone them onto one image, this new cloning tool allows you to preview the cloning your going to make as well as adjusting the size angle and pretty much everything you can think of.
First lets bring up the tool to do so do the following:
Window>Cloning Source – this opens up a dialog box that displays 5 cloning stamps, each stamp can be used on a separate image. If you check the box that says ”Show Overlay” you will see an overlay of what you will be cloning. And you will also see a box that say W:100% as well as H:100% this is telling you that the image that your sampling from is going to a cloning of exactly 100% both height wise and weight wise. This can be adjusted for a realistic perspective.
Before starting open all your images in Photoshop CS3. I will be using a total of 4 images, and choose one as a background (the main image that you will be cloning things on to). And on your background image create a new layer. And then start to sample of the other images. Note that you will need to click a diff stamp every time you want to sample of a new image.
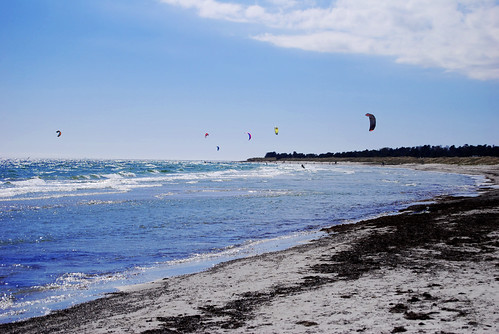
Here is my background image that I started with:
Then all you have to do is clone the objects back in, make sure that your are on the new layer. Because once your done you go back to the new layer that you have created and you erase the stuff that you accidentally cloned in, the wonders of layers!
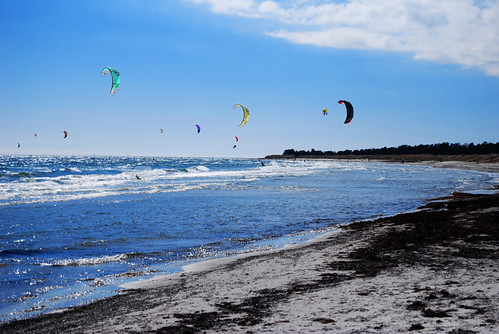
And here are the final results (note that I adjusted the levels of both of the images and their colours that is why they don’t look exactly the same): Note that the water is suddenly crowded with kite surfers that where not there from the begging. I added quite a few!
Cloning fun: Well yes you can also have some fun with cloning, I like to fun things so I’d just though I share this as a little extra:
Her is the original picture

I m just going to take their odd picture of myself (I have a project for it in mind if you where wondering), start of by adjusting the levels (Image>Adjustments>Levels play with the sliders till it looks good), give it some sharpening as well (Filter>Shapren>Unsharp Mask) lets also adjust the colours (Image>Adjustments>Hue/Saturation) play with the sliders till I get something I like:
So what I did here is that I just cloned another of myself like a shadow or a ghost effect by using the clone tool and a opacity of 50% note that you cant let go and click over the same spot again because this will make the totally cloning opacity of that location 100%, and thus you will not have a ghost effect. This is just one example of how you can have fun, you can also clone yourself with some famous people if you wanted to but who would like to do that, unless you have a great image of Winston Churchill. Yeah I had a stain on my shirt as well (a few) so I cloned those out as well.
And here is what I got:

I dedicate this tutorial to my older brother, because things are looking good for him it looks like he is going to move to his third year in his studies to become a doctor

No comments:
Post a Comment