
Hello everyone!
I would like to start of by thanking you guys for reading the blog and taking such interest in what i do, and what i like to share. I hope to see some of you stick around for a while and maybe partake in what i do some day, and hopefully we can become bigger and share the experience of capturing special moments with the camera.
I would like to say that on Wednesday the 2nd of this month i will be going on vacation till the 29th of July. What does this mean? Well it means i have not found anyone that wants to help me out so i think there will be no posting in 1 months period almost, if you feel you can help me out with a few posts while i m gone, feel free to drop me an email or post in the comments section and we can discuss it. I m sorry that i wont be able to post, but i will be going to a place in Spain where Internet will not be available to me.
p.s i m also stopping by Amsterdam, anyone know anything special i should stop by to see there? As in i must go?
Regards,
Alex
Monday, June 30, 2008
Readers: I m of on vacation
Photography: How to Photograph Fireworks
orginal post by dps blogWho doesn't like fireworks? I think thy are great and they put on quite the show. But how do you capture them on camera? Well read on and you will find out!
1. Stability
You will need a very stable surface, where the camera is steady. A tripod or a monopod or anything that will hold the camera in the position you want will work.
2. Remote Releases
Try using a remote release of some sort to fire of the shutter of your camera. This will make sure that the shot is 100% steady. If you dont have the remote release you could try your luck at the 10second timer or just press the shutter, which in most cases isn't going to render any blur but you can never be 100% certain.
3. Framing your image
Wow, this sounds hard? Well its is kind of hard to frame your fireworks shots, because you cant really be 100% sure were they are going to explode so to speak. And to make the fire works shots some what special you want to have something else but along with the fireworks in the frame right? To make ti better then all the other fireworks shots that are out there. So picture in your mind what you want to capture (lean towards the wider angle here) and if you capture to much you can just crop the image later on in post processing.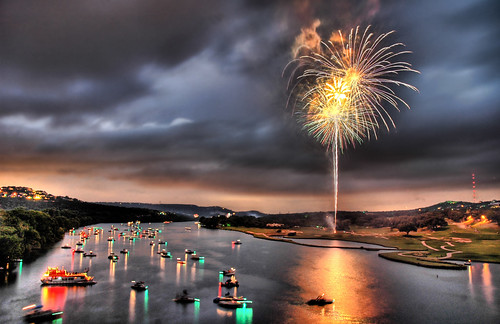
4. Focal length?
If you want to be on the sure side, always lean towards the wider angle so to speak, as this will capture more in your frame. But if you know exactly (or have a very good idea) where the fireworks is going to explode into a very beatiful pattern then feel free to zoom in as this will render some very interesting results.
5. Aperture?
I would suggest anything from f/8 to f/22, nothing below that that is for sure as you want to get as much as you possible can in focus (not to mention that the smaller apertures renders the "start" like shaping of strong lights)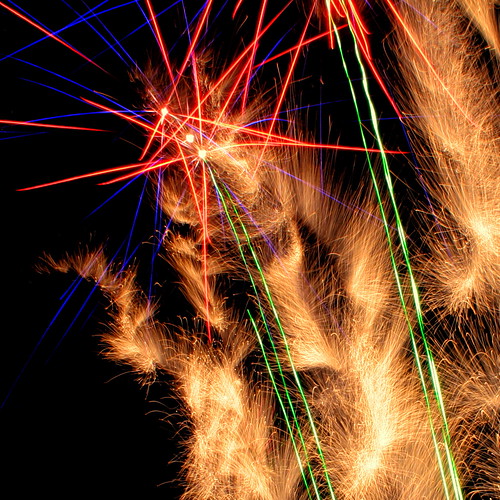
6. Shutter Speed?
I use the bulb mode on my camera when capturing fireworks. Why? As soon as i see the fireworks trailing towards the sky i open the shutter and just leave it open till the explosion has passed and you will get the entire firework in your image. From the long trail (or tail) till the beatiful explosion.
7. ISO?
100/200 should be more then enough, as your using bulb mode and the fireworks can be very bright, you don't want to overexpose the shot!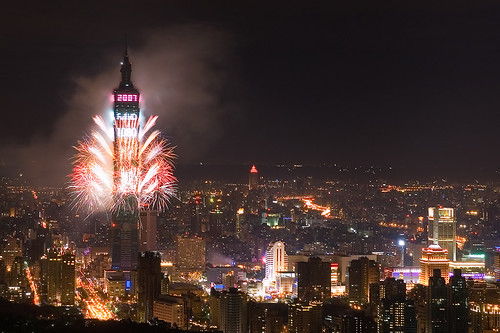
Saturday, June 28, 2008
Photography: 10 Surefire Landscape Photography Tips Part 2(2)
orginal post by dps blogTime for the second part before i m heading of to work, typing this while brushing my teeth, no problem i have a good 30 minutes to make it to work.
6. Look for Lines
Oh boy do i love looking for lines in my landscape photography. I try to look for them everywhere, i don't know if i have shared this with you guys but i m a very big fan of symmetry and i think symmetry looks great no matter where it is, and thats why i love lines. You want to be asking yourself the question "How am I leading the eyes of those viewing this image" and lines works really good.
7. Try to Capture Movement
Another one of my favorite things to capture, but i find it some what hard. Now this is great capture movement in your image, the wind in the trees, the waves on the beach, water flowing over a waterfall or moving clouds. These are some great attributes to add a bit of life to your images.
8. Work with the Weather
Its sure nice to go for a walk when the sun is shining, and take your camera with you when your walking and take some shots? I love that to, but you will find yourself getting better results when you have a overcast weather, the reason for this is that you won't get so many harsh shadows, you will probably not overexpose the shots because there is not any direct sunlight. And it gives you great opportunity to blur such things as water in movement without having to use any filter on your camera.
9. Work at the Golden hours
Whats are the golden hours? Well those are the hours when the sky the atmosphere is feeling warm, and your driving the car and you say "look at that sky" and some one replies "thats beautiful, i love the colors" those are the golden hours. The hours when you get some very very nice warm tones from the sky which everyone loves. Try before and after the sun set or sunrise, but don't wait to long specially when it comes to the sunrise. Sunset and sunrise do not render the same colors, sunset renders more vivid and warmer colors, but you usually get a very nice fog in the morning if you had a warm day.
10. Look were you focus.
To get most of things in focus you just dont want to place that camera and aim at what seems to be the middle of the photograph and press the shutter, this is going to give you some area that are going to be out of focus. What you want to focus on so to speak is 1/3 way up from the bottom of the frame that you want to capture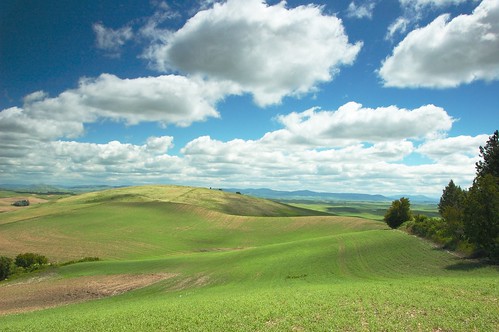
Friday, June 27, 2008
Photography: 10 Surefire Landscape Photography Tips Part 1(2)
orginal post by dps blogHey, i don't know if you guys have noticed but i am very big fan of landscape photography. And just anything goes in that subject for me, this is a combination of tips that you can already find on the blog as well as some new ones that i have put together for you. So sit back and hopefully this will be a nice read for you.
1. Get a big DOF (Depth of Field).
Now the beauty of landscape photography is that you get to show what your looking for, and for this you will be needing larger f numbers (smaller aperture) to get as much as you possible can in focus. So this wouldn't be the time to experiment with tight DOF's leave that for other types of photography. I find myself using f/22 the most often for landscaping and it has become a habit for me now.
2. Find some sort of support.
Use some sort of support, a tripod monopod or a bench the top of your car anything will work, as long as its steady. This will allow you to use a smaller aperture (small f number) and get no camera shake in the photograph. By choosing a smaller aperture (if your in A or Av mode) will make your camera use a slow shutter speed. If you can place the camera on the 10 sec timer and let that take the photograph to decrease even more camera shake, i often use my remote for the landscape photography when i have a stable place to lean the camera on, just because i want that super crisp shot
3. Look for focal points.
You want to have some sort of "main" focal point where you want to lead the eye towards, sort of it being the center attention of the photograph so to speak. This of course has to go on nicely with the entire photograph. Some examples that i found works great as focal points are: buildings, some sort of structure a striking tree or a rock boulder.

4. Think of the foreground.
To make the image appear a lot bigger with a lot more depth of field think of adding foreground elements, this will give the visual impression that your looking at a never ending landscape and will add that sense to freedom to your photograph.

5. Consider whats you have going on in the sky
Now i have realized that clouds or the look of the sky is going to impact the look of your photograph. This is something that is easier to work with in nations that found themselves on the north or the south part of the world, were you will find clouds pretty much everyday. Now this will add a lot of drama to your photograph, it will make it go from an nice shot to one of those superb shots. If you can't don anything about the sky dont feel ashamed of adding a different sky to the image. I have a folder where i keep several different sky images that i have shot, i took images of dramatic skies from different angles so you can apply it to different shots depending on where the sun is coming from.

More to come tomorrow, have a great Friday
Thursday, June 26, 2008
Readers: Feeling Thankfull?
I just wanted to let you guys know that i have added the possibility to donate money, for those who are very grateful and more fortunate then me and want to donate, its now possible.
If you donate it will be greatly appreciated by me, and i promise i will use the money into either getting this blog to its own URL, or invest in photographical equipment . It will all go to help you guys out.
Just though i would share the new add on to the website,
Thanks for reading, after all that is what keeps me going.
The donation button is located on the top right hand of the website
Wednesday, June 25, 2008
Photography: 7 To Reduce Camera Shake
Now that i finalized the article, the main problem was getting the images because i just couldn't find my point and shoot camera to illustrate with proper images. Turned out my mother had borrowed it while she was over because she wanted to sell some stuff on the internet.
Now lets get to it
I took pictures of myself in the positions that i use the most when shooting, and as the weather is often cloudy here in Sweden and i find i like to keep my ISO to 100 and a larger small apreture (larger f number) because i shoot alot of landscape to get it all in focus i often find myself using shutter speeds of 1/6 1/4 even 1/2 to get proper exposure. Now sometimes this means getting dirty and some times it means looking a bit weird in the crowd, but that something i have gotten used to.
Let sort this out by the times i use each style:
1. The the elbows together - most common for me
This is a position where i try to get the center of gravity as central in my body as possible, and i hold my elbows together as tightly as i can, sort of creating a triangular shape. Works good, but sometimes you will get blurry shots at 1/6. 1/6 seconds is doable in this position but takes practice.
2. The shoulder lean - common as well
This is a position that is very similar to the one above, but takes time to get used to it. In this position i press the camera with my right hand into my shoulder so to speak. The great thing about this position is that you wont get shake from breathing (lungs) or the beating hart because all you got over there are bones and muscles. Note, this position is better with longer lenses, not so good with the 50mm.
3. On my knees - like this one alot to.
This is a position that i also find myself using alot. I place one knee behind touching the ground and lay my leg flat down, creating some stability and then i flex the other knee as seen in the image below and then i lean one of the elbows on the frontal knee (often the same side so to speak) and put my weight forward on this knee and elbow while pressing the camera towards my face so to speak, so everything is nice and tight. This is a position that i can easily shoot 1/4 and 1/6. But once again it takes practice to master, not that i have mastered it yet.
4 Twisted Knee - Looks unstable buts its not really
This is a tricky one, but i actually find myself using it more and more. Its easier to use with longer lenses (i kind of regret using the 50mm as the lens on my camera but what can u do about it). In this position i lean my weight forward on my most frontal elbow that is leaning on my leg that is pushing back, sort of locking everything together. You can either have the back foot in the position as shown or flat on the ground. I find this way more comfortable. Tightening your muscles before the shot is taken makes everything a bit more stable in my opinion, so try that out. Don't forget to hold your breath.
5. Laying down - flat on the ground
No doubt that this the position that you will be the holding the steadiest shot because your whole body is laying on the ground. Works great, really nice. But be aware that your clothes can get dirty depending on the ground surface. I was taking these shots at home, but i often wear dark clothes when photographing just for the fact that i can lay down on the ground and not get dirty. There are two alternatives to this position, and the only difference is the hand that your leaning the lens on, either you lay it flat on the ground or you place it in a "punching" position, depends on how much height you need. But laying it flat is going to give you more stability.

6. The spiderweb - Comfortable.
This is pretty much where you create a human tripod. Spread your legs as in the shot and lean each shoulder on the knee/leg this works great to even out all the force so to speak. And lean a bit forward tends to help. I like this position and i use it when i want the "lower" angle shot. 7. From the hip - nice and easy
I press the camera against one of my hip hones with both of my hands and see how things turn out. This can get you some pretty good shots because you can't really tell what you will get in frame. But i have a pretty good idea of what i will get in frame if i m shooting at 18 for example. Lean a bit forward and push the camera into your body. This position works great for getting those "surprise" shots where people don't really think your taking a picture untill its too late.
Hope that helped some people out.
Now i would like to point out some "general" pointers while i mon the subject! Hold your breath for a while when taking the photo, and make sure you have a steady grip on the camera. And have the strap attached some were don't have it hanging about like i have it in these shots, its unsafe. Now i was just doing a quick example and wanted to speed things up. Have the camera around your neck/hand or what ever suits you.
If you have any good positions that work take a photo add a little explanation and i will be more then willing to share it here.
Tuesday, June 24, 2008
Equipment: My Experience With Cokin CPL
A reader wanted to know a bit more about the Cokin filter systems. So i m going to share my experience with the Cokin P-system (there are various filter systems this is the most common one)
The only filter i have at the moment is the circular polarizing filter, and i m liking this filter alot. Let me start of with the reason why i got this filter; as most of you know i will be heading down to Spain (next week) and i m going to be by the beach side alot, most of the time and i will be shooting some landscapes that will involve the water, so i got the filter because i wanted to take the reflections of the water to show its true color, and to ease my post processing work.
Now what a polarizing filter does is you can read here
Here are some sample images with and without the CPL:
The effect of the CPL on clouds (click the image for larger version)
The effect of the CPL on water (click the image for larger version)
Here is a photo that has been taken with a CPL and no post processing has been done to the image:
Note: When using polarizing filters at wider angles you will get a different look, as you can see in the image above, thats why the sky looks like its two different colors. But i like it. I love the shot the way it is, so no post processing needs to be done to it, which saves me some time.
Now here is how the Cokin system works, when you mount it to the camera (video)
Another article to come later today.
Equipment: What you will Find in my Bag
Melissa suggested that i do a little show and tell! Which i decided was not a bad idea. Because i m not using top the of the line DSLR's or even semi pro DSLR i ma using a entry level model and this could help to illustrate that its no the price tag on the camera that is going to take the god shots its the person behind it and know how to master the peace of equipment your holding between your hands while taking the picture.
Here it goes for what you will find in or very very near my camera bag at all times:
(click the image for a larger size).
Now i m going to go from the top left hand side of the image and then to the right hand side, on the first row:
- My camera bag (you can see how i pack it here)
- Cokin P holder (for filters)
- Nikon D40x mounted with the 50mm f/1.8 lens and 52mm UV filter on the lens
- Nikon 18-55 f/3.6-5.6 kit lens and 52mm UV filter on the lens
- Cokin 52mm adaptor ring
- SB 600
- My memory cards (total of 5GB) and information card
- Coking cirucal polarazing filter
- Omnibouncer for my SB 600
- Spare battery (charge no on the image)
- Blower for cleaning the camera sensor
- SB 600 bag with stand and bounce cards
- Generic remote for the camera ($1 over at ebay) works great
More images of my equipment
Picture taken with a Cannon PowerShot SD600 and ok point and shoot camera.
Monday, June 23, 2008
Critique: Robs and J Fidel Photographs
So this is great, getting some one on one time with my readers. Sorry that it has taken me so long to reply but i was working today and i cloud not stay up all night yesterday critiquing your shots!
Thanks alot for sending in some shots so to speak
First of I will start with Robs photograph, you can see it below (click it for bigger version)
Here is the EXIF data:
| Camera: | Canon EOS 5D |
| Exposure: | 0.033 sec (1/30) |
| Aperture: | f/4 |
| Focal Length: | 105 mm |
| ISO Speed: | 400 |
| Exposure Bias: | 0 EV |
| Flash: | Flash did not fire |
One thing that is clear to me right of the bat is that the white balance is of, why can i tell this? Because the photo has a very warm feeling to it and i m thinking that this was shot indoors under some sort of light either fluorescent or some other sort i cannot really tell.
The composition is really good on this photo, i like how the lines work across the image, but i must say it looks a bit too crowded if it was going to be a "food" photo shoot so to speak, but if it was a shot to show what was avaliable on the table it give is a rather good feel across the entire image. But something that bothers me a bit is that on top left hand side of the image, there is a some empty space which messes with the lovely symmetry a bit, but that an easy fix with a crop. The white balance issue can also be solved if the photo graph was taken in RAW.
I think the DOF of the photographs works, seems to show a very nice even "central" DOF, shows a bit of everything that was avaliable on the table so to speak. Apart from the white balance and the crop issue i think the shot is great the way it is.
Thanks for sharing Rob,
Now to J Fidels Photograph as seen below (click it for larger version)

| Camera: | Nikon D80 |
| Exposure: | 0.008 sec (1/125) |
| Aperture: | f/5.6 |
| Focal Length: | 85 mm |
| ISO Speed: | 200 |
| Exposure Bias: | 0/6 EV |
| ISO Speed: | 200 |
The shots is a bit underexposed (which is alot better then overexposed it can be fixed easily by adjusting the levels in photoshop) that is what strikes me the first. I see that you tried to frame the shot with what i like to call a natrual frame, which its a bit of center so to speak which can be fixed with a little crop, when it comes to macro photography i like to place my objects in the center specially when they are flowers. There is a some what a larger DOF on this photograph and this could be because you have used f/5.6, but i clearly see why you would ahve done it. Combining some what of a longer focal lenght with a larger apretrue usualy renders some what a very tight dof but this isnt going to be the scenario if the objects surounding the main focal point are very close.
I would have spot metered in this case, you used yourself a matrix metering which ins't bad but you will se that it tries to find a balance with the background and the foreground which has rendered some sort of inbetween thing which doesn't really work. I would have also tried my wides possible focal lenght on the shot and gotten up really close to the flower (distoreted it a bit) thus it would appear a bit bigger then the other things in the photograph and thus it would have stood out more.
How is that for some critique guys? Thanks alot for sharing the images and if you have any questions concearing what i have said feel free to share.
Sunday, June 22, 2008
Readers: Send In Your Photo
Okay, i think i will have time to get some one on one with you readers. So what i mean by this if you have a shot you want me to improve using Photoshop i can do so, if there is a photograph that you want to get MY critique on then send that in, or link it in the comment section. Now i will try to help out the most of you guys that i can possibly can and of course add a explantion to what i did to the photograph if i used photoshop for instance, or i will explain whats good or bad with your shot that you decided to send in.
Now before anything, critique can be very harsh at some time, and will all due respect i want you to take my advice or my critique with a pinch of salt, and there is nothing personal involved. I don't know all the guys/gals that read this blog personally!
I hope that this works, and lets get some things going.
Have a good Sunday!
Photography: How to Photograph Water
Got this great tip from a reader that i should write something about photographing water. And i think that is great ( i was feeling empty with no ideas for the past two days) idea. I combine the element of water into to a lot of my photographs, if you seen them you can know what i m talking about!
Now there are two question you should be asking yourself before photographing anything that has to do with water in movement and that is: Do i want to freeze the water or blur it?
If you want to freeze the water, your leaning towards using faster shutter speeds or do you want to blur the water, then your going to have to use slower shutter speeds.
But how do i freeze water during the night or freeze water in general?
- Use higher ISO
- Use a flash
- Use a smaller f-number (larger aperture)

So how do i blur the water, to give it t that dreamy effect?
- Use slower shutter speeds
- Larger aperture (to increase the shutter speed)
- Use a tripod or hold the camera still

Now there are times where you just wont be able to freeze the water and then you just have to go for the other option, which is blurring it which is never wrong either.
Using filter to help the blurring of water:
There is a filter which is called a neutral density filter or ND filter that will reduce the amount of light that will come into the camera, thus allowing the flexibility for longer shutter speeds without overexposing the image on a very bright day.
Adding the element of water to your images:
Adding the element of water to images is something i do quite often, this is because i live close to the ocean and have grown up with it, and i love it and i also think it adds that little extra to the images at time. The sun always sets over the water which often give s a nice clear background, which is very easy to use if your lining up a shot etc. Work with the water try to combine it in good way with your photographs. Use a Polarizing filter to reduce the glare you would normally get of the water which can ruin the photograph.
I just recently picked up a Polarizing filter and i m loving it, still need to get a ND filter.
I hope that helps to understand the very basics of shooting water. I m going to start to think about a very good thing to write about, if not always dig into the archives and take a look at some of the older posts!
Saturday, June 21, 2008
Readers: I don't know what to write about
I seriously dont know at this stage what to write about! Quite sad, i can't think of anything.
Do you have anything you want to read about?
Thursday, June 19, 2008
Readers: What do you think?
Was a tad bored so i started going through some older pictures that i was just not happy with or they were in my "potential" to become something good after processing. So i though i share one of my creations with you
Here is the before:

Here is the after:

Photography: Food
orginal post by dps blogA reader wanted to know a little bit more about food photography, so here is what i have picked up along the way.
The Lighting
For starters you want to treat your food like any other objects (which is pretty much is). I did some research before writing this article that is for sure, and i did some searches over at flickr and what i could tell right of the bat was that people where not shooting under the right light conditions (and as i have stated over the past lightning is everything in photography). One of the best places in my opinion if your going to shoot any still life or food as a matter of fact is in the early mornings by the window, were you will find plenty of natrual light, now if you dont have the luxery of some great natrual light you could aslo bounce the flash of a ceiling or a wall to give a more balanced light that decrease the amount of harsh shadows that you will find. If your shooting during mid day, try to reflect some of the light back by using a home made reflector (anything white will do, as white reflects about 80% of the light). But the natural light makes the food look very natrual and fresh.
Props it
I been very lucky, my mother has always through my life placed the food in some what a fancy way during the sunday dinners, where she sets up certain plates and placeses the food on the plate on a certain way, but looking at some food magazine i realised that this isn't all that should be done, you can also add props. What i mean here is that you should take a look at where your placing the plate for example, i really like "clean" photogrpahy so to speak so a nice white background would look great with nothing in it. Its also very improtant to see what type of plate that your placing the food in, make sure that works with the set up of the food as well as with the lines. If you have a dish that is rather smooth, like soup for example, break eveything up a bit and place it on a square plate or a plate with sharp eges to give the iamge some attitude. Also if your going to palce some extra props around the shot to fill a whole table, place maybe a spoon that will be out of focus, maybe a glass or a napkin. These elements can often be placed in secondary positions in the foreground or background of your shot.
photo by: Hypnotic Aubergine

Be Quick
We all know that food doesn't stay fresh for very long (this is where the food differese from the still life), so plan ahead, try different set ups before your actually placing up the food, and are ready to take the shot. A stake doesn't look a juicy after 1 hour compared to when it just came of the grill, note that some foods tend to change colors as well depending on when they have been prepared. Set such things up as exposure, white balance aperteture before your going to start. And when in doubt try out pretty much all you know and then let the food come to.
Style it
Style the food, give it some life. This is maybe as important to show whats on the plate, pay attention to shape lines etc, work with them or work against them. Take a look at the cooking boks and see how they styled the food shots, they maybe added some dill to the salmon photograph, or a bit of chocolate around the plate for the special desert. Its always good to take a look at some work before shooting it yourself.
photo by: MR+G

Enhance it
One tip that a photographer gave me last week when I said I was writing this was to have some vegetable oil on hand and to brush it over food to make it glisten in your shots.
Get Down on a Low Angle
Please don't shoo the food directly above, this is very unappealing to the eyes and you cannot see the nice set up of the food, choose a angle of 30 or 40 degrease from the table, this si a very common angle for food photography. Try shooting from the plate level as well as a bit above it, this should give you better looking results.
photo by: Hypnotic Aubergine
Macro it
If the dish lets say a salmon dish with potatoes (lets keep it simple) and everyone is very aware of the taste of potatoes (and in my opinion they are nothing special) you want to make sure that salmon is perefectly in focus. This will enhance the salmon and make the "best" part of the dish stand out amongs the rest, use your apretures as well to limit the depth of field.
Steam it
Having some sort of liquid (often the clearer the more appleaing) will enhance the look of your food, or give it that "just cooked feel" which i personaly like alot and i think most of us enjoy. Try adding some of that steam behind the shot if you cannot get it the natrual way, place a maybe a soaked cotton in the microwave for a while till its very hot and "hide" it amongs the food.
I hope that can give you guys a basic idea of how to go about photographing food. I m going to look for some example shots and add them to thread later on.
Wednesday, June 18, 2008
Photography: Get a nice silhouette in camera
I m going lay down a quick tip right here. I actually read this in a Swedish photo magazine and i though it would be great sharing because its fast and quick, makes alot easier in the post processing area.
Now, why i m telling you this? Well because i find myself shooting more and more photo's everyday and lets say i go for about a 4h shoot and take lets say 60 pictures, i will probably end up using lets say 10 of those shots (found that to be my average of decent picture, or shots that get taken the way i want to). That means that i will spend about 30min or so each image depending on what effect i want to give the photograph (which i usually already have in mind). So that is quite alot of time and time that i don't really have. Plus i started shooting film again :)
So i m going to start of simple, on how to get a very nice silhouette in the camera. So how do i do it?
As i have explained there are several ways of doing this (remember the article i wrote a while back on how to get good sunset shot) well this is pretty much the same.
Instead of choosing the matrix metering mode i will choose spot metering, and what i will do is that i will point my camera towards what looks to be the brightest spot in the sky (silhouettes often work best with a very nice sky) and when i have found this spot i will hold down me AE-L or AF-L bottom on my camera (this locks the metering so to speak) and then i will move the camera down and line up my shot and press the shutter. This will give you some very nice results. You could also go into the M mode (if you have time) and mess around with the shutter speeds and the apreture, but if your in a hurry the spot metering will never fail you.
If you still have the sun in your image, try not to meter of the sun, this will give you a very underexposed shot. Too underexposed thus not rendering some very good results, so meter of a relative bright area instead.
Below is an example shot that was given in the magazine, images taken by Geoff Simpson
Tuesday, June 17, 2008
Readers: What inspires you?
This is a question for those of my readers that consider themselves more of an artistic photographer, i was just wondering about what inspires you? Where do you find it?
I find it in alot of places, when just walking about. Or maybe i find it while browsing a magazine, watching tv or emotions that i m going through. One thing that i find really important is too keep an "idea" book or notebook if you will where i write down all the projects that i have in mind, this is a book that i review quite often and i try to carry it around with me at most time if not i will jot the info down on my cellphone and later transfer it to my book. Its a great way to keep your creativity going!
Feel free to share
Photography: Understanding Histograms
orginal post by dps blogWhat is a Histogram
Histograms are a topic that we could (and probably should) spend a lot of time talking about but let me give you a very brief answer to get you through in the short term.
Histograms are a very useful tool that many cameras offer their users to help them get a quick summary of the tonal range present in any given image.
It graphs the tones in your image from black (on the left) to white (on the right).
The higher the graph at any given point the more pixels of that tone that are present in an image.
So a histogram with lots of dark pixels will be skewed to the left and one with lots of lighter tones will be skewed to the right.
The beauty of a histogram is that the small LCD display on your camera is not really big enough to give you an great review of a picture and you can often get home to find that you’ve over or under exposed an image. Checking the histogram can tell you this while you’re in a position to be able to adjust your settings and take another shot.
Some Examples of Histograms
Let’s look at a couple of examples of histograms on shots I’ve taken over the first year of my son’s life (it’s his birthday this week so we’re going through some shots).
Compare these two shots and their corresponding histograms:


The above shot has a lot of light tones - in fact there are parts of the shot that are quite blown out. As a result on the right hand side of the histogram you can see a sudden rise. While there are quite a few mid tones - everything is skewed right and with the extreme values on the right hand side indicate an over exposed shot.


This second shot has a lot of dark tones. This is partly because of the black and navy clothes in the shot - but also because it’s slightly underexposed shot. The resulting histogram is quite different to the first one - the values are skewed to the left hand side.
Is there such a thing as a ‘good’ histogram?
As with most aspects of photography, beauty is the in eye of the beholder and there’s always a lot of room for personal taste and different ways of expressing yourself as a photographer.
There is no such thing as the ‘perfect’ histogram - different subjects and photographic styles will produce different results. For example taking a silhouette shot might produce a histogram with peaks at both ends of the spectrum and nothing much in the middle of the graph. Taking a shot of someone at the snow will obviously have a histogram with significant peaks on the right hand side…. etc
Having said this (and to generalize) - in most cases you’ll probably want a fairly balanced shot with a nice spread of tones. Most well exposed shots tend to peak somewhere in the middle and taper off towards the edges.
Using Histograms While Shooting
So now you know what a histogram is - grab your digital camera’s manual and work out how to switch it on in playback mode. This will enable you to see both the picture and the histogram when reviewing shots after taking them.
Keep an eye out for histograms with dramatic spikes to the extreme ends of either side of the spectrum. This indicates that you have a lot of pixels that are either pure black or pure white. While this might be what you’re after remember that those sections of the image probably have very little detail - this is a hint that your image could be either over or under exposed.
The histogram is really just a tool to give you more information about an image and to help you get the effect that you want. Having your camera set to show you histograms during the view process will tell you how your image is exposed. Learning to read them will help you to work out whether you’re exposing a shot as you had hoped.
Another Example of a Histogram
Lets finish this tutorial by looking at one last example of a histogram:

You can see in this shot a much more even spread of tones. It’s still not perfect and I’d do a little post production work but it’s a much more evenly exposed shot and the histogram reflects this.
Sunday, June 15, 2008
Photography: AEB (automatic exposure bracketing)
orginal post by dps blog
Have you ever found yourself in that situation when you get those very overexposed or very underexposed shots no matter what you do? Well AEB is your thing then, read below and enjoy this great thing.
Now AEB has made exposing a photograph alot easier, and you will get alot more detail in the final shot if you combine the given amount of exposures.
By selecting it you can quickly take three shots (usually three) at different exposures without having to manually change any settings between frames. You can see an example of this below

When you select AEB your camera will choose the one exposure, the one that the will be given by your metering, once this selected the camera will one other shot on either side of this best guess (one over exposed (as in the left shot above) and one underexposed (as in the right shot above)).
This way you end up with the three images in a series with exactly the same composition but at different exposures for you to select the best of later on.
If you have the camera in burst mode (continuous shooting) the three shots will be taken if you hold down the shutter for a burst of three shots. If you’re in single shot mode the shots will take as you depress the shutter three times.
Each digital camera has a different way of selecting AEB, some like Nikon’s D70 have an accessible button on the back (marked BKT) while others (like Canon) have an AEB setting in their menus.
Check out your manual to see how AEB works on your digital camera. Most will allow you to change the variation between shots by different ’stops’. For example you might want a big variation between your three shots and would select a ‘2 stop’ gap or you might only want a slight variation and choose a ‘half stop’ gap. I generally start with a ‘1 stop’ variation and work from there.
Threw in a quick tip here, been moving stuff all day. Finally back home, tired worn out but i won't give up on you guys this easy. I just saw a thunderbolt going of outside, if there are more i m going to try capture one with my camera!
Readers: Sorry
Sorry readers, i haven't posted today. I don't have a PC at the moment, so i posting this from my iTouch, the reason that i couldn't post is that there is no furniture at my parents house which is were i m currently staying to help them move. Its now 00:13 and were finally done. I'm quite tired now, so i will be going to bed.
Once again I'm terribly sorry!
Friday, June 13, 2008
Photography: Intro To Shutter Speeds
orginal post by dps blogI have covered apreture and i have covered ISO. Now its time for shutter speeds!
What is Shutter Speeds?
Lets make it simple: "its the amount of time the shutter is open" - pretty simple, right!
This used to mean in film photography, that it was the amount of time that the film was exposed to the scene your were photographing, now its the sensor of your camera instead of film. Or if you want its the amount of time the "eye" is open to grab as much light as it needs or you want to give it.
Let me attempt to break down the topic into some bite sized pieces that should help digital camera owners trying to get their head around shutter speed:
-
Shutter speed is measured in seconds - or in most cases fractions of seconds. The bigger the denominator the faster the speed (ie 1/1000 is much faster than 1/30).
-
In most cases you’ll probably be using shutter speeds of 1/60th of a second or faster. This is pretty much because its rather easy to cause camera shake when your using anything "above" this or slower then this. I can handhold at 1/6th but it has taken me a few time to practice this, but you can also do this if you keep working on it!
-
If you’re using a slow shutter speed (anything slower than 1/60) its recommended you use a tripod or some some type of image stabilization, or a place were you can lean the camera or if you can lay down and use your elbows as support.
-
Shutter speeds available to you on your camera will usually double (approximately) with each setting. As a result you’ll usually have the options for the following shutter speeds - 1/500, 1/250, 1/125, 1/60, 1/30, 1/15, 1/8 etc. This ‘doubling’ is handy to keep in mind as aperture settings also double the amount of light that is let in - as a result increasing shutter speed by one stop and decreasing aperture by one stop should give you similar exposure levels (but we’ll talk more about this in a future post).
-
Most DSLR's give you the option of slow shutter speeds, or long exposures as some people call these are not fractions of seconds but are measured in seconds. This will be displayed in your camera as the symbol: " meaning seconds, from 1 second to 30 or when you go into bulb or B-mode. Bulb mode lets you keep the shutter open for as long as you hold it down, so you can in theory use shutter speeds of hours days if you wanted to, not that i know anyone that has done this but i can be done. But a note here, the longer the shutter speed is open the more reluctant you are to get digital noise in your images.
-
When considering what shutter speed to use in an image you should always ask yourself whether anything in your scene is moving and how you’d like to capture that movement. If there is movement in your scene you have the choice of either freezing the movement (so it looks still) or letting the moving object intentionally blur (giving it a sense of movement).

-
To freeze movement in an image you want to user a faster shutter speed, and if you want if you want the movement blur you’ll want to choose a slower shutter speed. The actual speeds you should choose will vary depending upon the speed of the subject in your shot and how much you want it to be blurred.
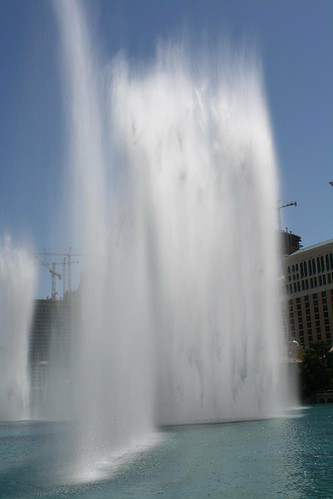
But motion is not always bad there are moments where you just want to add some movement to your sill photo but have a main subjects frozen, this can be achieved by using a rather slow shutter speed of lets say 1/6th which will hopefully freeze some movement and if you have a train passing by or something that will be blurred, thus adding motion to your image. Which in my opinion looks great. This can also be applied to give water that dreamy effect as you can see on the image below by our reader Rob Coughey
-
Focal Length and Shutter Speed - another thing to consider when choosing shutter speed is the focal length of the lens you’re using. Longer focal lengths will accentuate the amount of camera shake you have and so you’ll need to choose a faster shutter speed (unless you have image stabilization in your lens or camera). The ‘rule’ of thumb to use with focal length in non image stabilized situations) is to choose a shutter speed with a denominator that is larger than the focal length of the lens. For example if you have a lens that is 50mm 1/60th is probably ok but if you have a 200mm lens you’ll probably want to shoot at around 1/250.
Have a good day
Thursday, June 12, 2008
Photography: 10 Quick Tips for Travel Photo
orginal post by dps blogYes, Alex is feeling lazy today. Why? He has been moving furniture and boxes packing and unpacking all day, so its video time! I would like to thank you guys one more time for letting me use your "web hosting" site to post pictures over here. I m thinking of getting you all special treat this weekend to a very nice interesting entry!
Enjoy this video, hopefully it will help a bit more.
Wednesday, June 11, 2008
Readers: Do you host your images on the web?
I was just wondering if anyone one of your readers host your images on the web and if so, if you could share a link in the comment section and if possible i could use them as sample images on the blog if i would need one. I m honestly running out of images from my photos so to speak! So that would be great.
Thanks for all the wonderful comments i received earlier, means alot
Equipment: The Camera Modes
I m going to cover this, what each camera mode does on your camera (its stated in your manual but in a boring way)

![]() This mode will automatically select a large aperture (small number) which helps to keep your background out of focus (ie it sets a narrow depth of field - ensuring your subject is the only thing in focus and is therefore the centre of attention in the shot). Portrait mode works best when you’re photographing a single subject so get in close enough to your subject (either by zooming in or walking closer) so that your photographing the head and shoulders of them). Also if you’re shooting into the sun you might want to trigger your flash to add a little light onto their face.
This mode will automatically select a large aperture (small number) which helps to keep your background out of focus (ie it sets a narrow depth of field - ensuring your subject is the only thing in focus and is therefore the centre of attention in the shot). Portrait mode works best when you’re photographing a single subject so get in close enough to your subject (either by zooming in or walking closer) so that your photographing the head and shoulders of them). Also if you’re shooting into the sun you might want to trigger your flash to add a little light onto their face.
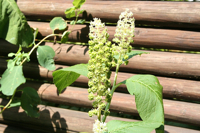
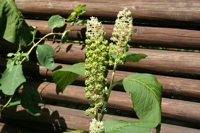
Macro Mode
![]() Macro mode lets you move your closer into your subject to take a close up picture. It’s great for shooting flowers, insects or other small objects. Different digital cameras will have macro modes with different capabilities including different focussing distances (usually between 2-10cm for point and shoot cameras). When you use macro mode you’ll notice that focussing is more difficult as at short distances the depth of field is very narrow (just millimeters at times). Keep your camera and the object you’re photographing parallel if possible or you’ll find a lot of it will be out of focus. You’ll probably also find that you won’t want to use your camera’s built in flash when photographing close up objects or they’ll be burnt out. Lastly - a tripod is invaluable in macro shots as the depth of field is so small that even moving towards or away from your subject slightly can make your subject out of focus. (I’ll write a full tutorial on Macro Photography in the coming weeks).
Macro mode lets you move your closer into your subject to take a close up picture. It’s great for shooting flowers, insects or other small objects. Different digital cameras will have macro modes with different capabilities including different focussing distances (usually between 2-10cm for point and shoot cameras). When you use macro mode you’ll notice that focussing is more difficult as at short distances the depth of field is very narrow (just millimeters at times). Keep your camera and the object you’re photographing parallel if possible or you’ll find a lot of it will be out of focus. You’ll probably also find that you won’t want to use your camera’s built in flash when photographing close up objects or they’ll be burnt out. Lastly - a tripod is invaluable in macro shots as the depth of field is so small that even moving towards or away from your subject slightly can make your subject out of focus. (I’ll write a full tutorial on Macro Photography in the coming weeks).
Landscape Mode
![]() This mode is almost the exact opposite of portrait mode in that it sets the camera up with a small aperture (large number) to make sure as much of the scene you’re photographing will be in focus as possible (ie it give you a large depth of field). It’s therefore ideal for capturing shots of wide scenes, particularly those witch points of interest at different distances from the camera. At times your camera might also select a slower shutter speed in this mode (to compensate for the small aperture) so you might want to consider a tripod or other method of ensuring your camera is still.
This mode is almost the exact opposite of portrait mode in that it sets the camera up with a small aperture (large number) to make sure as much of the scene you’re photographing will be in focus as possible (ie it give you a large depth of field). It’s therefore ideal for capturing shots of wide scenes, particularly those witch points of interest at different distances from the camera. At times your camera might also select a slower shutter speed in this mode (to compensate for the small aperture) so you might want to consider a tripod or other method of ensuring your camera is still.
Sports Mode
![]() Photographing moving objects is what sports mode (also called ‘action mode’ in some cameras) is designed for. It is ideal for photographing any moving objects including people playing sports, pets, cars, wildlife etc. Sports mode attempts to freeze the action by increasing the shutter speed. When photographing fast moving subjects you can also increase your chances of capturing them with panning of your camera along with the subject and/or by attempting to pre focus your camera on a spot where the subject will be when you want to photograph it (this takes practice).
Photographing moving objects is what sports mode (also called ‘action mode’ in some cameras) is designed for. It is ideal for photographing any moving objects including people playing sports, pets, cars, wildlife etc. Sports mode attempts to freeze the action by increasing the shutter speed. When photographing fast moving subjects you can also increase your chances of capturing them with panning of your camera along with the subject and/or by attempting to pre focus your camera on a spot where the subject will be when you want to photograph it (this takes practice).
Night Mode
![]() This is a really fun mode to play around with and can create some wonderfully colorful and interesting shots. Night mode (a technique also called ’slow shutter sync’) is for shooting in low light situations and sets your camera to use a longer shutter speed to help capture details of the background but it also fires off a flash to illuminate the foreground (and subject). If you use this mode for a ’serious’ or well balanced shot you should use a tripod or your background will be blurred - however it’s also fun to take shots with this handheld to purposely blur your backgrounds - especially when there is a situation with lights behind your subject as it can give a fun and experimental look (great for parties and dance floors with colored lights).
This is a really fun mode to play around with and can create some wonderfully colorful and interesting shots. Night mode (a technique also called ’slow shutter sync’) is for shooting in low light situations and sets your camera to use a longer shutter speed to help capture details of the background but it also fires off a flash to illuminate the foreground (and subject). If you use this mode for a ’serious’ or well balanced shot you should use a tripod or your background will be blurred - however it’s also fun to take shots with this handheld to purposely blur your backgrounds - especially when there is a situation with lights behind your subject as it can give a fun and experimental look (great for parties and dance floors with colored lights).
This mode is really a semi-automatic (or semi-manual) mode where you choose the aperture and where your camera chooses the other settings (shutter speed, white balance, ISO etc) so as to ensure you have a well balanced exposure. Aperture priority mode is useful when you’re looking to control the depth of field in a shot (usually a stationary object where you don’t need to control shutter speed). Choosing a larger number aperture means the aperture (or the opening in your camera when shooting) is smaller and lets less light in. This means you’ll have a larger depth of field (more of the scene will be in focus) but that your camera will choose a faster shutter speed. Small numbers means the opposite (ie your aperture is large, depth of field will be small and your camera will probably choose a faster shutter speed)
Shutter Priority Mode (S or TV)
Shutter priority is very similar to aperture priority mode but is the mode where you select a shutter speed and the camera then chooses all of the other settings. You would use this mode where you want to control over shutter speed (obviously). For example when photographing moving subjects (like sports) you might want to choose a fast shutter speed to freeze the motion. On the flip-side of this you might want to capture the movement as a blur of a subject like a waterfall and choose a slow shutter speed. You might also choose a slow shutter speed in lower light situations.
Program Mode (P)
Some digital cameras have this priority mode in addition to auto mode (in a few cameras Program mode IS full Auto mode… confusing isn’t it!). In those cameras that have both, Program mode is similar to Auto but gives you a little more control over some other features including flash, white balance, ISO etc. Check your digital camera’s manual for how the Program mode differs from Automatic in your particular model.
Manual Mode
In this mode you have full control over your camera and need to think about all settings including shutter speed, aperture, ISO, white balance, flash etc. It gives you the flexibility to set your shots up as you wish. Of course you also need to have some idea of what you’re doing in manual mode so most digital camera owners that I have anything to do with tend to stick to one of the priority modes.
