
I had a recent comment by a reader, and he was interested in how i compose my shots. So i m going to try to explain it to him and you guys!
At first when i started to photograph, i had a hard time with composition, i guess it was just because i was new to the whole idea and i was a bit rusty on the compostion side, not really aware of the "rules" that help you etc.
If you go back to the last pages of my flickr you will see that i wasn't so great at it myself from the start. But what i did is that i practiced and photographed and now i m learning the about the power of the crop. Just a small side note here: a crop can change alot about your image. Take the image blew for example.
This is the image taken straight out from the camera:
Its an alright shot, nothing special really
But after playing around with in photoshop and cropping the image this is what i ended up with:
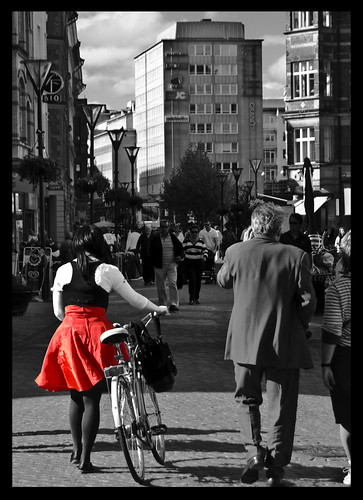
Now this is a much better image if you ask me, only looking at the crop, i had the whole idea of selective coloring in mind when i took this photo, which i something i often do, i get and idea of what i m going to do in the post processing work to enhance the image and make it better, specially when i dont have enough focal length.
When i m about to capture something i often take a few shots before i m happy with one, i m talking 3 to 4 shots at different angles working with the light against it using flash, looking at lines that i can use to help my image, pretty much looking for anything abnormal that will make the photo unique in some way.
I often start out by just walking about the subject or what ever i m going to shoot and i start out with a focal length in mind, i know about how much 18mm is going to cover so if i m going to shoot at 18mm i will plan what the viewfinder will see and then maybe fine tune it by change the focal length a bit etc. Then i check my camera settings, thinking about what aperture i m going to use, i find myself working at the extremes the most often. I either use the i big aperture or a rather small one., sometimes in between. And then i go about shooting the image.
The rule that stands out the most to me has got to be the rule of thirds, its help out alot and when i personally think of this rule i have in mind that i dont want to place the "main" lines in the middle of the frame, i will bring them up bring them down depending on what is surrounding the object i want to shoot, or my main focal point if you will!
Focal points are very important, try to stick to a main focal point that will standout amongst the rest, making it easier for the viewer to view your image (that for example the selective coloring on the image above, i wanted the focal point to be on the girl and by doing that the eye goes straight for her, note that she is also standing on one of the lines of thirds and so is the shadow line in front of her).
So i its time for the general purpose tips again:
Go close and low:
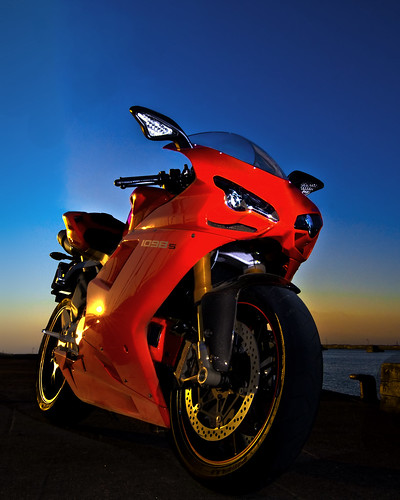
What i mean by this is that if you want a smack in your face, thats what i call them, go down to your lowest focal length and you will get that bigger effect. Works great if your shooting a car or anything that you want to play with size a bit. Like the shot below for example i wanted to make the car "stand" out amongst the background so i went wide and low and i tried to fill the frame.

Look for unique shapes and lines:
Look for something that will lead the eyes of the viewer to your focal point, this will make a huge difference in your image, and it will add to your composition as well. In the shot below i used the lines of the bench to work their way towards myself, as well as a strong light contrast in the back.

Choose carefully:
What do you want in focus? Choose that it can make a huge different, i have wanted to try this but i never found the right moment so far, where i have an object in the foreground that is razor sharp while the background is blurred and still recognizable, this will add depth to your photos. The same goes for choosing object to stand in the foreground. I dont have an example of this, i m sorry.
Look for contrast and color difference:
Looking for a contrast in anything will boost your image, take that image above for example, the black and white works really nicely, creating a silhouette and thus making myself stand out alot on the white advertisment poster in the background. Look for colors that will stand out. If you can use opposite colors. The image below is an example where i applied both contrast, color as well as go wide and down. The final results are a bike that stands out with what is a colorful background, and choosing a lower focal length made it blow out a bit of proportion so to speak, to create that "in your face effect" as well as a crop.
When i m about to capture something i often take a few shots before i m happy with one, i m talking 3 to 4 shots at different angles working with the light against it using flash, looking at lines that i can use to help my image, pretty much looking for anything abnormal that will make the photo unique in some way.
I often start out by just walking about the subject or what ever i m going to shoot and i start out with a focal length in mind, i know about how much 18mm is going to cover so if i m going to shoot at 18mm i will plan what the viewfinder will see and then maybe fine tune it by change the focal length a bit etc. Then i check my camera settings, thinking about what aperture i m going to use, i find myself working at the extremes the most often. I either use the i big aperture or a rather small one., sometimes in between. And then i go about shooting the image.
The rule that stands out the most to me has got to be the rule of thirds, its help out alot and when i personally think of this rule i have in mind that i dont want to place the "main" lines in the middle of the frame, i will bring them up bring them down depending on what is surrounding the object i want to shoot, or my main focal point if you will!
Focal points are very important, try to stick to a main focal point that will standout amongst the rest, making it easier for the viewer to view your image (that for example the selective coloring on the image above, i wanted the focal point to be on the girl and by doing that the eye goes straight for her, note that she is also standing on one of the lines of thirds and so is the shadow line in front of her).
So i its time for the general purpose tips again:
Go close and low:
What i mean by this is that if you want a smack in your face, thats what i call them, go down to your lowest focal length and you will get that bigger effect. Works great if your shooting a car or anything that you want to play with size a bit. Like the shot below for example i wanted to make the car "stand" out amongst the background so i went wide and low and i tried to fill the frame.
Look for unique shapes and lines:
Look for something that will lead the eyes of the viewer to your focal point, this will make a huge difference in your image, and it will add to your composition as well. In the shot below i used the lines of the bench to work their way towards myself, as well as a strong light contrast in the back.
Choose carefully:
What do you want in focus? Choose that it can make a huge different, i have wanted to try this but i never found the right moment so far, where i have an object in the foreground that is razor sharp while the background is blurred and still recognizable, this will add depth to your photos. The same goes for choosing object to stand in the foreground. I dont have an example of this, i m sorry.
Look for contrast and color difference:
Looking for a contrast in anything will boost your image, take that image above for example, the black and white works really nicely, creating a silhouette and thus making myself stand out alot on the white advertisment poster in the background. Look for colors that will stand out. If you can use opposite colors. The image below is an example where i applied both contrast, color as well as go wide and down. The final results are a bike that stands out with what is a colorful background, and choosing a lower focal length made it blow out a bit of proportion so to speak, to create that "in your face effect" as well as a crop.

2 comments:
I love the black and white silhouette photo.
Great Capture
Thanks :) i like it to
Post a Comment