
There has been alot of DIY things floating around in my head, and as some of you know a while back i showed you how i did some "studio" shots that work really nicely if your into product photography.
Below are some "essentials" that you will kind of need, but that you also probably have laying around in the house.
1. Light
Some sort of light is a big advantage, the more you can move it and twist it the better. But if your planning to combine two different light sources try not to do so, because it will mess with your WB. Remember to preset the WB, which makes life a lot easier in the post process stuff. Light is not necessary but it allows for flexible working hours so to speak.
2. Background
Black and white paper, or sheet or cloth or a t-shirt, anything that is uniform in one of the colors will make great backgrounds. Remember you can also combine colors, just have in mind what "effect" you want to go for. Remember you can also reflect light with the white objects!
3. Camera
The only thing you will mostly working with here is aperture and shutter speed, so its not only DSLRs that you can use this with, also those high end compacts will work for this type of project.
4. Some sort of "tripod"
What i mean here is that you dont need a tripod tripod, one of those things with three legs etc. The whole idea of this is that you want to have the stuff laying around, to take some photos if your bored for example. I have used everything from a cup to books to pillows, to anything that will create a new angle will work. The more things you use as your tripod the messier its going to get, so think about that before your stacking up with 30 books to use.
5. Glass
Glass, might be hard to get, but it was not for me. Glass is great to lay above your background color to create the "reflective" effect, so if you have a picture frame that is a bit on the older side, odds are that the cover is made from glass and you can just remove it from the time being. Thats what i did and it worked great - now handle the glass with care, i dont want to hear stories about you guys cutting yourself, and handle the glass with some sort of protection to keep those finger/fat prints of it!
Thats pretty much it, with some practice you can pretty much have your own studio at home, the bigger the subject the bigger everything needs to go - that pretty much a studio in a nutshell
Wednesday, November 5, 2008
Photography: Home Made Studio
Tuesday, November 4, 2008
Photography: Taking Unfocused Shots
orginal post by dps blog
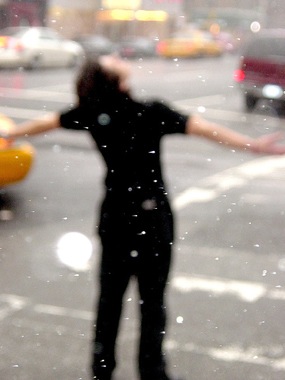
We all have heard out there that they key to good photography has always been to get those perfectly sharp and in focus shots, specially when it comes to portraits.
However purposely leaving your main subject (or the whole shot) out of focus can also create a stunningly dreamy images also.
1. You might choose to focus on a seemingly unimportant element of the scene (do this by choosing a wide aperture which will give a narrow depth of field and focus on something in front of or behind your main subject).
2. The other option is to make your full image out of focus but choosing to focus well beyond or in front of your main subject. Again, a wide aperture will help here and you will probably need to switch your camera to manual focusing mode or it will attempt to find something to focus upon.
This second option will take a little experimentation. Get things too unfocused and you’ll end up with a completely unrecognizable subject - the key is to have enough focus for it to be recognizable but out of focus enough to create a wonderful dreamy mood.
Below are two more examples of unfocused images for a little inspiration.


Monday, November 3, 2008
Photography: Backlit Subjects
orginal post by dps blog
Back light has some what been another one of those typical "no no" things that you should not do when it comes to photography. One of the first thing that some one thought me was to always shoot with the sun hitting your back. This just made pictures better for some reason, but during the past few months i been checking out back light photography so to speak. And its really nice
Why backlight?
- backlight can add drama to an image
- backlit images can show the delicacy of a subject (think transparent or translucent things like flowers or insects)
- backlight can help create real mood in a shot
- backlit images can highlight details on the edges of subjects
- backlight can reveal textures that might previously have been hidden
- backlit images can show off the shape and form of a subject
- backlight can create shadows that add points of interest to an image
Below are some really nice backlite photos:

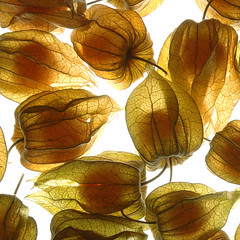
Another thing worth mentioning is that metering can play a big difference here, so try spot metering if you want the foreground to be properly exposed or use a fill flash! Try a few different things, and feel free to share!
Saturday, November 1, 2008
Monthly Assignment : November
The monthly assignment is something that i m going to start this month and its going to be going for the whole month, until the end of it that is.
So what is this deal? Well its to push you to get some nice shots and to work as an incentive so to speak to get your camera out there. Note i will also working on this.
So how does it work? Well what you want to do is that you want to upload the image to flickr and tag it with "blacker-november08" for the November assignment for example and, and the last word in the tag will change from month to month, and year wise as well, note that were moving into 2009 soon!
So this months assignment is going to be, Portraits
This mean a photograph that includes a person some how.
There are some rules to be followed, this they are the only to get you working and practicing your photography. The rules are that the image should be taken on the same month for the monthly assignment so to speak. So for this month the shot has to be taken in November.
I will pick a personal winner, and who knows i might reward that winner some how?! So lets start snapping those images, and remember you only got one image per person!
Categories that i will judge the image by: lightning, creativity/idea, theme, composition, and i will ask my mom what she thinks (she is very biased and only likes a very few pictures), but she wont make the final decision but it will have some sort of influence.
Get out there and shoot some portraits for me :) and place some entries, remember to post the image in the Bläcker Photography Flickr Group, if not i cannot find them that easy! Thanks!
Most important of all is that you have fun
